Parsnip Puree: A Mashed Potato Alternative To Die For

I love mashed potatoes! Garlic mashed potatoes? Even better. But I have to admit that sometimes while I’m mashing I feel like maybe there’s something a little more exciting or different I could be making. Something with the same texture and the same satisfying creaminess.

Well, I found the something! The something is REALLY GOOD. The something is PUREED PARSNIPS (plus a little potato). This is most definitely worth a try! It’s a slightly sweeter play on mashed potatoes, with the same satisfying richness. I seriously love this. Continue reading

Beef Short Ribs Braised In Red Wine

This was dinner a few nights ago. Delicious short ribs slow-cooked in red wine. This was my first time braising beef short ribs. I braise oxtail more often, which I think would also work well with this recipe. I’m an oxtail addict. The meat is much softer and juicier, although it’s probably a little fattier than the ribs. I found this recipe on cbc.ca, I liked it best out of a few that I read through.

IMG_7340

The meal consisted of these yummy saucy ribs, pureed parsnips (recipe here), and a kale salad with sweet potato, carrots, and beets. It was a perfect combo. The pureed parsnips were REALLY good. A great alternative to classic mashed potatoes. I’ll be posting that recipe soon. 🙂

Beef Short Ribs Braised In Red Wine
Serves 4-5 people

*I cooked my ribs in a slow cooker, but you could try doing this in a pot on the stove if you don’t have a slow cooker. I slow-cooked the ribs for eight hours, you could probably let them cook on the stove for about three. Continue reading

Peace, Love, Perfect Guacamole.

Making a perfect guacamole is a really useful (and tasty) skill to have. This delicious Mexican dip is a healthy snack, a good appetizer, and a perfect addition to a pot luck or barbeque menu. This is one of the first dips I taught myself to make, because it’s one of my favourites. It’s one of everyone’s favourites!

IMG_7460

I’ve gotten so many compliments on my guac over the years. It is time I share my secret. (Not too much of a secret…it’s pretty simple, actually.)

A few important guacamole rules I live by:
1. RIPE AVOCADOS
2. NO GARLIC
3. USE CILANTRO
4. SAVE THE PITS

Your avocados have got to be ripe for maximum sweet, creamy, delicious avocado flavour and mashing potential. You can tell an avocado is ripe when its skin has darkened and it is soft when you squeeze it.

Here are some videos I found on youtube that might help if you have avocado problems:

Despite popular belief, authentic Mexican guacamole doesn’t include garlic. When people ask me why my guac tastes different from theirs…it’s usually the garlic. So, save your garlic for something else!

Cilantro is a key ingredient in a good guacamole. Cilantro and lime are like a Mexican flavour-match made in Mexican flavour heaven.

A common problem when using avocado is that the avocado will start turning brown. This browning occurs once the avocado flesh is exposed to the oxygen in the air. (Same thing that happens with apples.) Although slightly brown avocado is still safe to eat…it’s not very nice to look at. There are  few things I do to keep my guac super green, and so far, it’s been working amazingly!
1. Lemon/lime juice slows down the browning process and is already one of the ingredients
2. Save the pits and put them back into your bowl of guacamole after you’ve made it. Food specialists claim that keeping the pit in the avocado also slows browning. It works for me!
3. If I need to store my guacamole, I use plastic wrap pressed right up onto the dip itself. Make sure there are no air bubbles. This way your guac comes in contact with as little air as possible. Refrigerate.

Perfect Guacamole

Ingredients:
I’ve made this so many times that I don’t measure my ingredients anymore. Your main ingredient is the avocado, all the other ingredients can be used to taste. Add ingredients bit by bit and taste as you go! TIP: don’t over-do the onion…may result in lethal onion breath burn.

  • 2 ripe avocados
  • 1/2 jalapeno pepper (or to taste)
  • Approx. a quarter of a red onion, not too much!
  • Fresh cilantro about 5-6 sprigs (wash and trim ends)
  • Juice of 1 lime (Can substitute with lemon juice. But lemons are bigger, you may not need to juice the entire thing.)
  • Sea salt and ground black pepper to taste
  • 1 tomato, remove all the seeds, diced (optional, I don’t always add tomatoes)

IMG_7446

1. Cut avocados in half. Remove pits and save for later. Scoop out all the avocado flesh into a bowl.

2. Finely chop red onion, cilantro, and jalapeno. I use a food processor. The processor will make sort of a paste-like mixture and your dip will be smoother. For a more chunky guac, chop with a knife. If you’re not a fan of spiciness, you can remove the jalapeno seeds. Jalapeno peppers aren’t generally too hot. I usually use half a pepper and leave the seeds in. Transfer chopped mix into the bowl with the avocado.

3. Add lime juice, salt, and pepper.

4. Mash, mash, mash, mash, mash. You avocados should be ripe enough to mash in the bowl with a fork. Continue mashing and mixing until everything is smooth and well mixed together. You can mash more or less depending on whether you like a smoother or chunkier dip.

5. Add in your chopped, deseeded tomatoes before serving. The seeds are removed to get ride of the excess water/juices. Without removing all the innards of the tomato, the juices will leak out and your guacamole will end up being really watery. If I’m bringing my guac to a friend’s, I always play it safe and keep the tomatoes on the side. Mix them in right before eating. That way you avoid watery pools forming. (I don’t have tomatoes in my photos because I didn’t add any this time around.)

6. To prevent browning, stick the pits back into the dip and lay plastic wrap right onto the top of the guacamole (no air bubbles.) Refrigerate if not serving right away.

IMG_7464

6. Serve with tortilla chips. 🙂

¡Buen apetito! xx


This Kitten Is Now On Facebook And Twitter!

This Hungry Kitten is finally on Facebook and Twitter! Like and share! Follow and tweet!

I’ve also given the blog a makeover and hope you like the changes. I’d love to hear suggestions.

Came across this gem today, and it made me smile. 🙂

lobster me

Thanks for reading! xx

Oyster Boy: An Oyster Girl’s Dream

It only took me a dozen oysters at Oysterfest in Toronto two years ago to realize what I’d been missing out on for so many years. I hadn’t eaten raw oysters before that special day, and fell in love with the briny beauties instantly. I didn’t know much about oysters or the oyster community in Toronto back then. All I knew was that I needed to find out where the best oysters were, and have some more!

I AM SO GLAD I FOUND OYSTER BOY.

IMG_0597

It’s not only their AMAZING oysters that make Oyster Boy my favourite oyster bar. It’s also the atmosphere. I love everything about the place. It’s a small, warm, cozy restaurant by Trinity Bellwoods Park on Queen Street West with wonderful food and terrific people. Everyone is extremely friendly, from the shuckers, to the servers, to the chefs. It’s one of those restaurants that you walk into and can feel the love. You feel their love for oysters, for the restaurant, and for eachother. The restaurant is simply, and very well, decorated. The walls are adorned with all things oyster and the sea. You’ll find a beautiful collection of everything from family photos to seaside memorabilia, art, maps, and oyster shells. They’ve even got pretty little oyster shell light fixtures along the walls. You can tell each of these pieces has got a story behind it, and that’s what makes it more special than anything. Take the time to check it all out. Oyster boy is like a small family that welcomes you into their home. I sometimes joke that it’s my second home (and by joke, I mean I sort of wish it was). Everything’s just so great there that it seems silly to go anywhere else. For a while I didn’t even bother trying other oyster bars. I’ve now tried a handful of places in Toronto, and have to say that Oyster Boy remains my fave.

Oyster Boy has built a strong reputation for being one of the best oyster houses in the city. They are also one the main suppliers of oysters in Toronto, catering to restaurants, events, and private parties. Their oysters are always fresh and you’ll find some of the top shuckers in Canada behind the oyster bar. They’re super friendly, and so knowledgable. There’s lots to learn, so ask away! In fact, they hold really great shucking classes at the restaurant on weekends. I did a class a few months ago and it was loads of fun. You’ll learn more than you’d ever dream about oysters and all the tricks to shucking them the right way. The best part though, of course, is eating your first 16 self-shucked beauties.


My first time shucking at a shucking class. Call to check availability and book a class. Booking a class with a group of friends or colleagues for a birthday or work event is a great idea. 🙂

IMG_6300
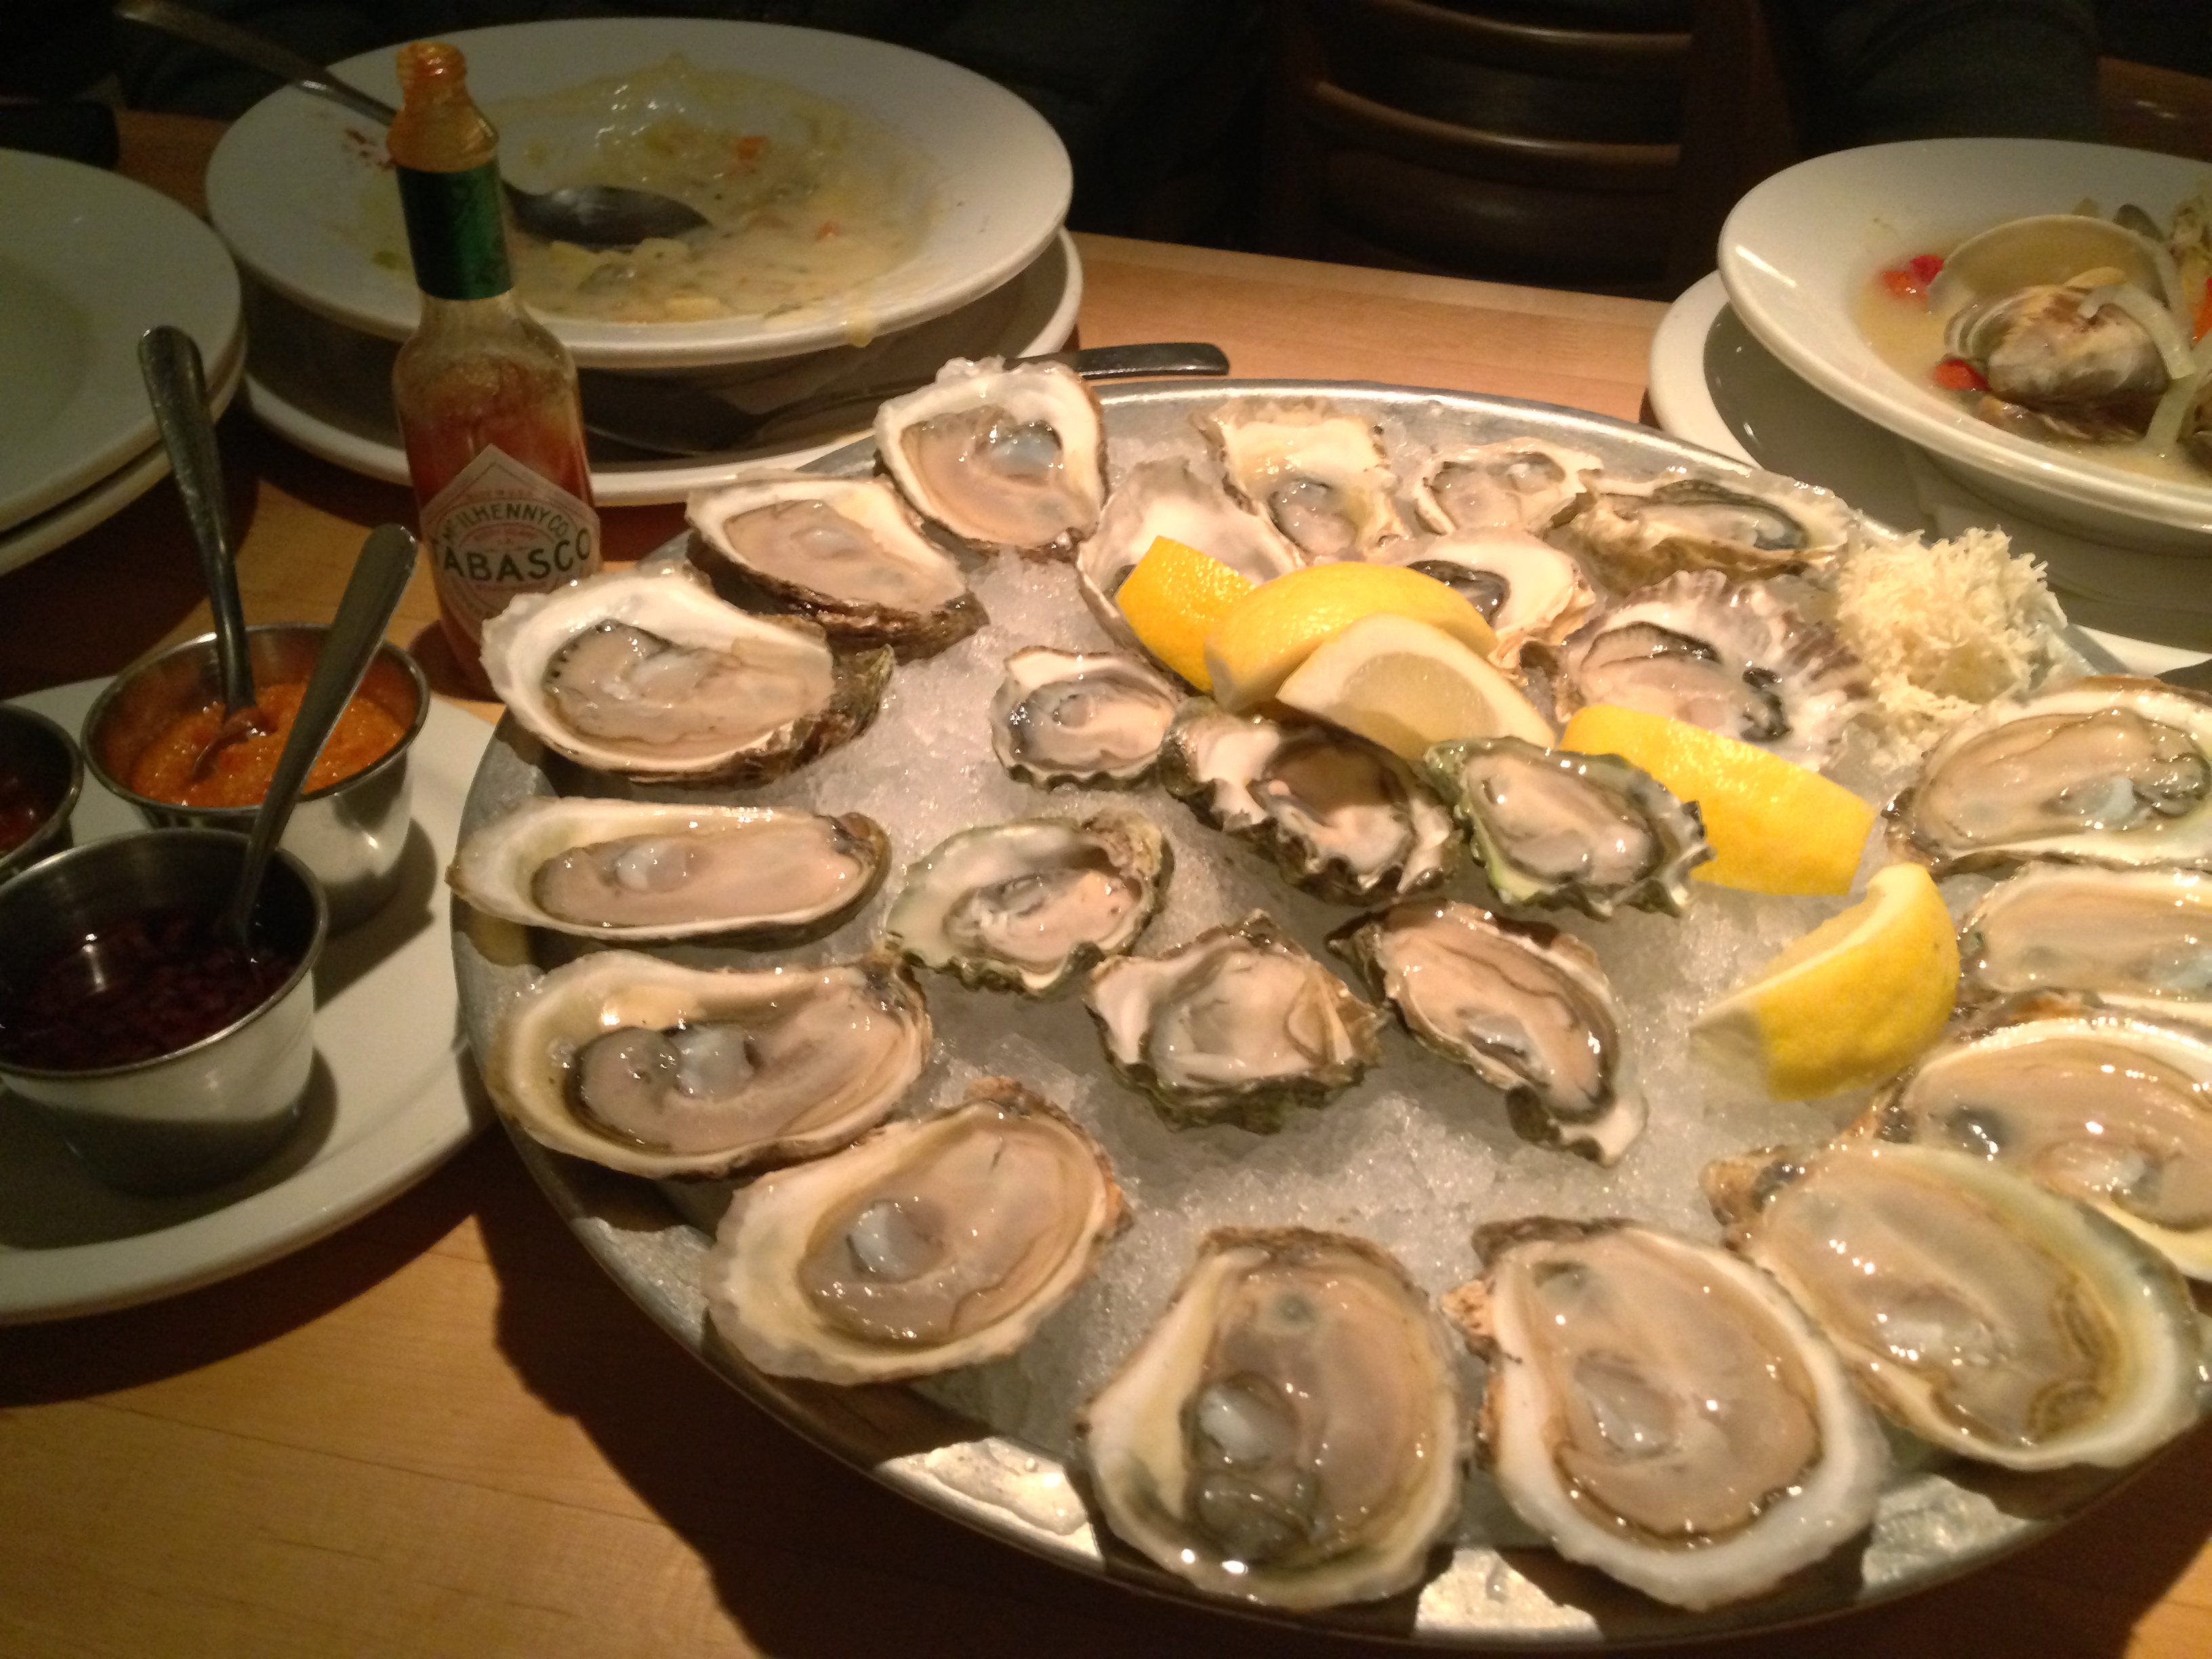
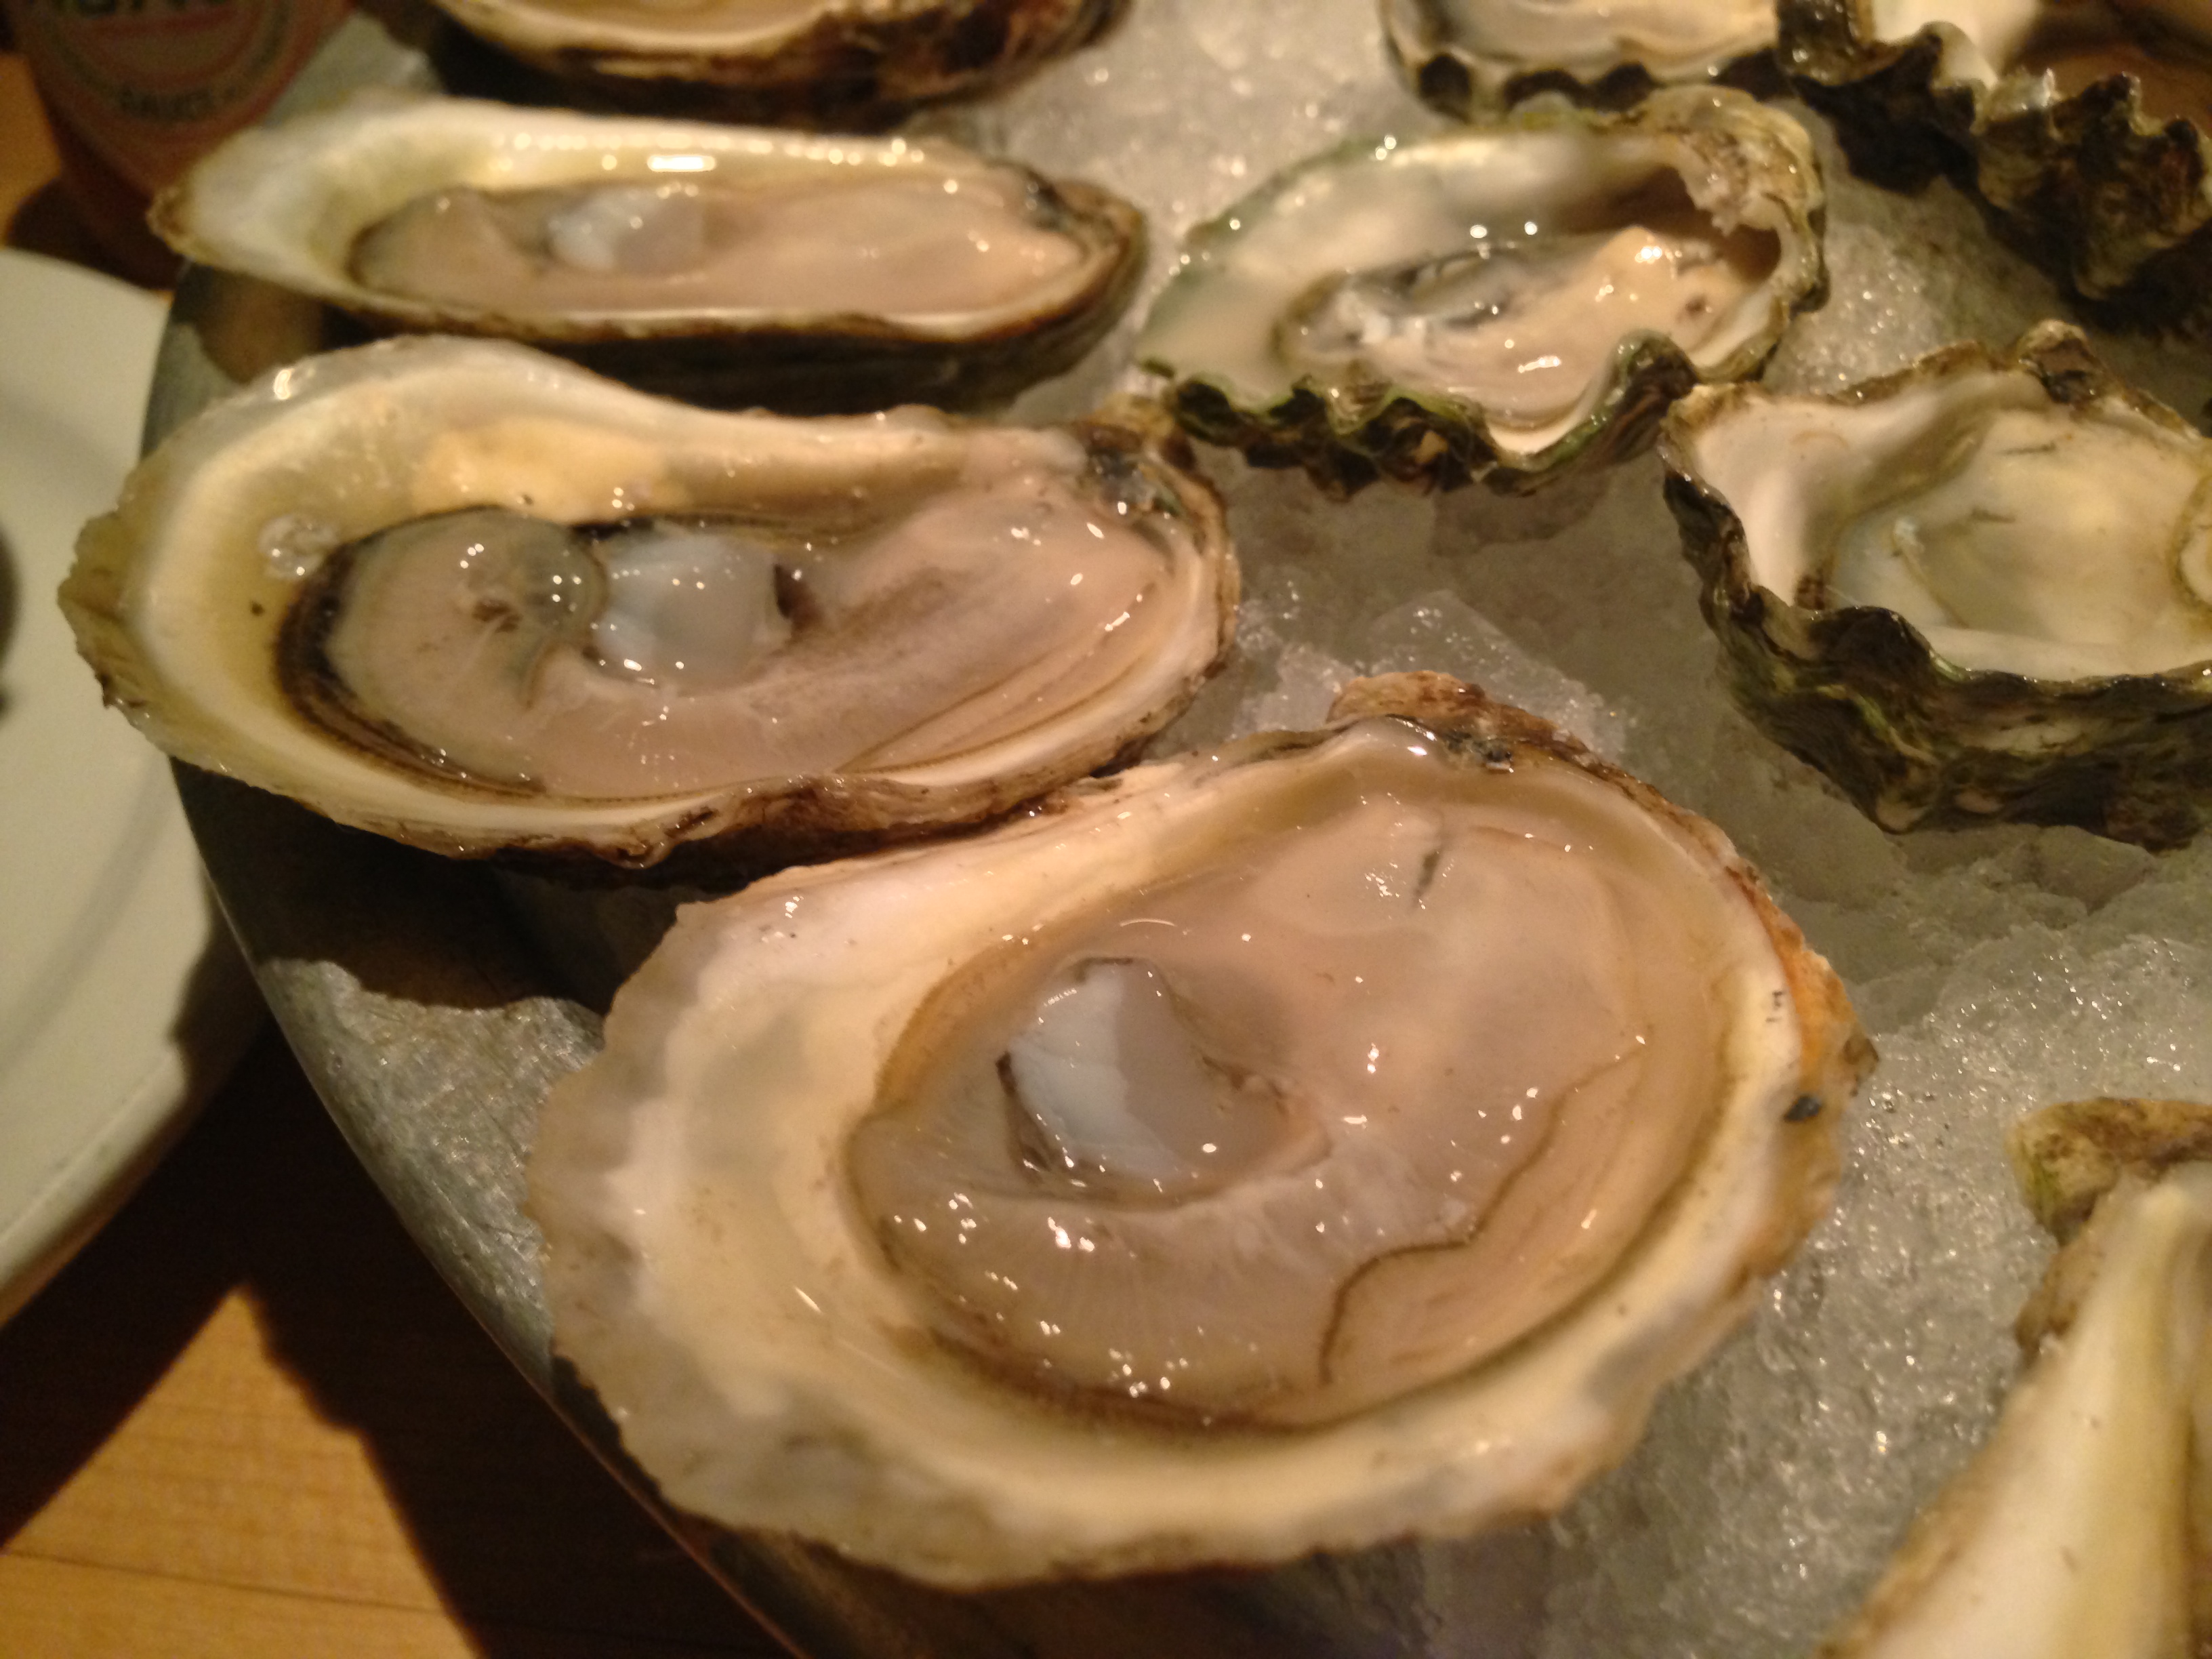
Our two dozen from my visit last week. These were Plack Pearls (BC), Kumamotos (USA), and St. Simons (NB). Delish. We always ask the shucker which oysters are particularly good that day. If you’re not sure which oysters to order, be sure to ask. The servers and shuckers know their stuff, and they’ll give you great suggestions.

IMG_6304
The St. Simon oyster is one that we order quite regularly. This is a great one to start with for oyster-eating beginners. St. Simons are light, salty, slightly sweet, and delicate…nothing too robust.

IMG_6308
The Black Pearls were really yummy, and they’re gorgeous to look at. The shells were more thin and delicate than most others I’ve seen, and the oysters had frilly black edges. They were a perfect combination of salty and sweet, and almost had a slight watermelon or melon rind flavour to them. We liked these so much that we saved them for last. 🙂

IMG_6302
Kumamotos have always been a favourite of mine. Definitely worth a try…and then another try (and another one). They are small oysters that originate from the Kumamoto region of Kyushu, Japan. They were transported to the United States and are now farmed on the west coast. They have deep cupping, fluted shells (like a little oyster bucket…so cute) and a mild, smooth, sweet taste. They are sometimes described as having a buttery flavour. I’ve also heard them be referred to as a “dessert oyster”. I always say they’re like the cheesecake of oysters…maybe that’s taking it a little too far…I love cheesecake.

IMG_6272Oysters are always served with lemon, freshly grated horseradish, and three housemade sauces. The sauces include a cocktail sauce, a ginger and banana pepper hot sauce, and a shallot and red wine vinaigrette. The hot pepper blend is not too hot, it adds the perfect amount of spice, and the red wine vinaigrette is amazing. Their sauces are the best I’ve had.

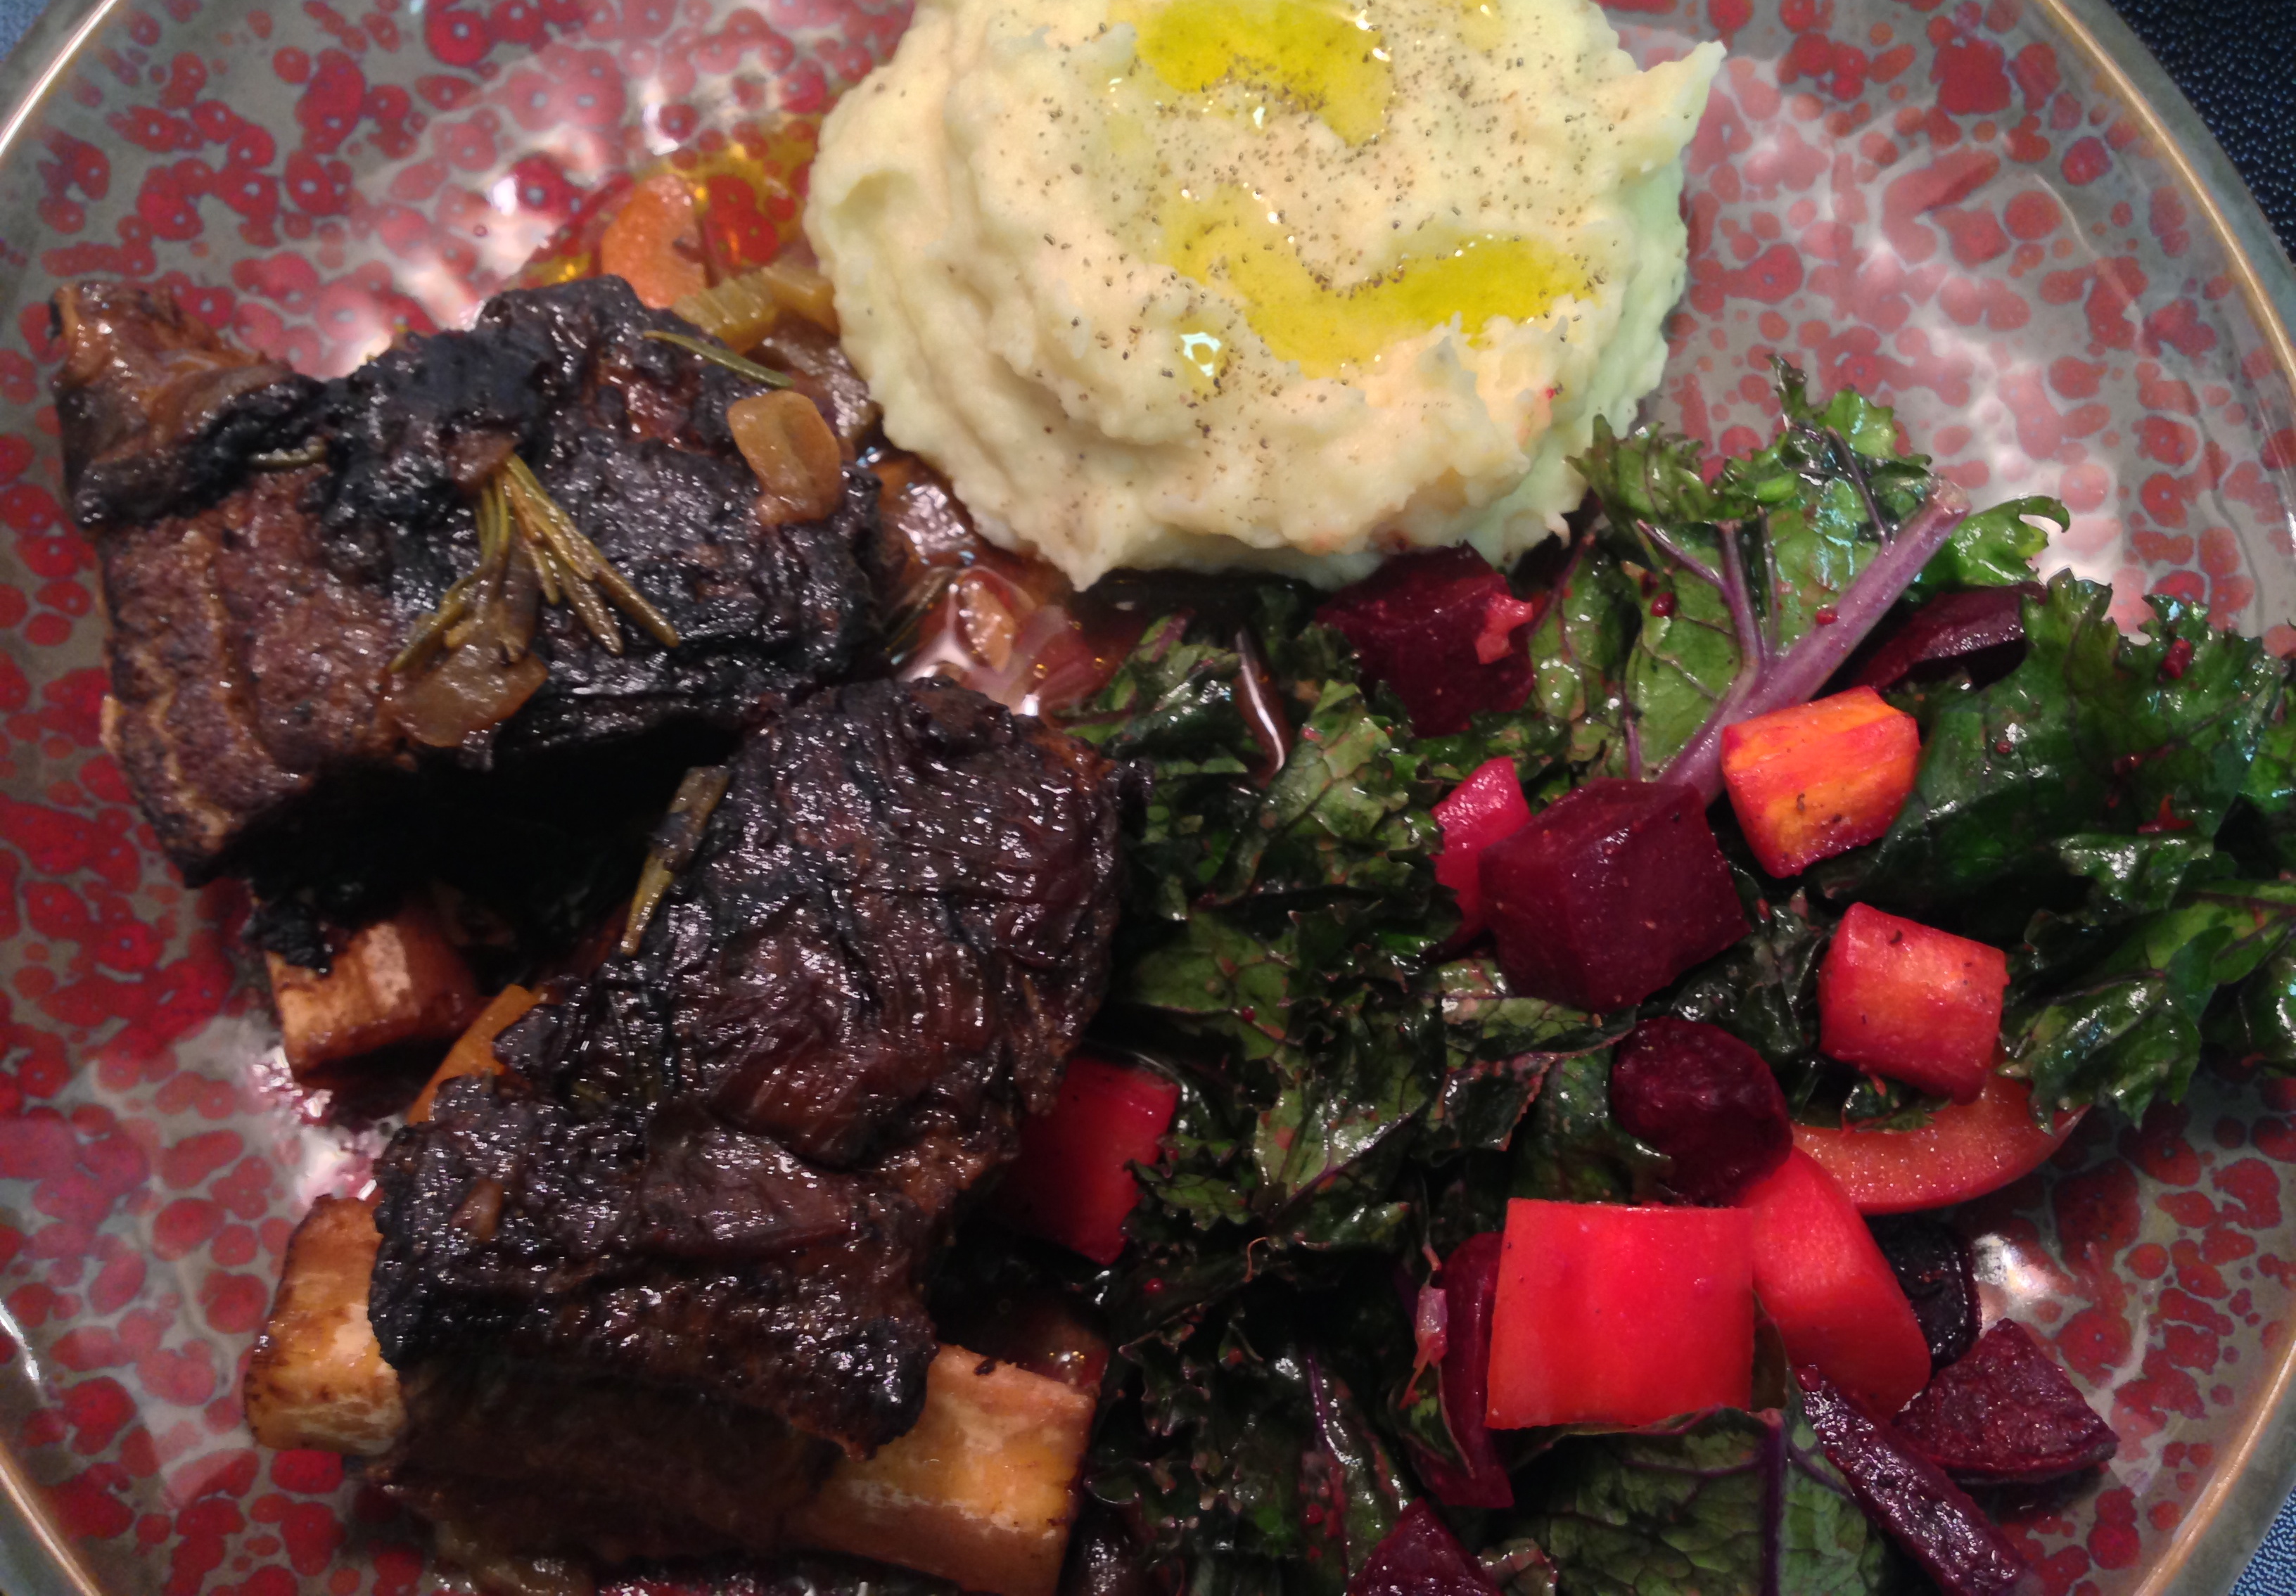
There are cooked oyster options too, if you’re not into the whole raw seafood thing. They bake oysters a few different ways, or you can order them fried. I’ve tried the Oysters Royale, baked with crab meat and a sherry bechamel. A really nice change from the classic Rockefellers you find at most other restaurants.

There are so many other oyster varieties I’ve eaten at Oyster Boy. Some of the others include Black Point, Beach Angel, Malpeque, Caraquette, Caspumpec, Cavendish Cup, and Colville Bay oysters. Try some from the east coast, and some from the west. Mix it up!


They have my favourite beer on tap. (Another plus.) Pints of Beau’s (and Jameson) have become our Oyster Boy tradition. It’s what I order every time I’m there. Spicy caesars are good too (with fresh horseradish, yum!).

Although oysters are a main attraction for me, I cannot deny that the rest of the menu is equally delicious! Oyster Boy is a seafood lover’s dream come true. I’ve been lucky enough to try a number of different menu items on my many visits. We always order a couple of other things to go with our oysters.


I am a huge chowder fan and the Sustainable Seafood Chowder here is really good. It’s rich and hearty, and the nice, plump clams are the best part. A lot of the time they have a daily soup special as well, so make sure you ask your server. The daily specials are always tres fab!

smoked whitefish jalapeno corn chowder ob
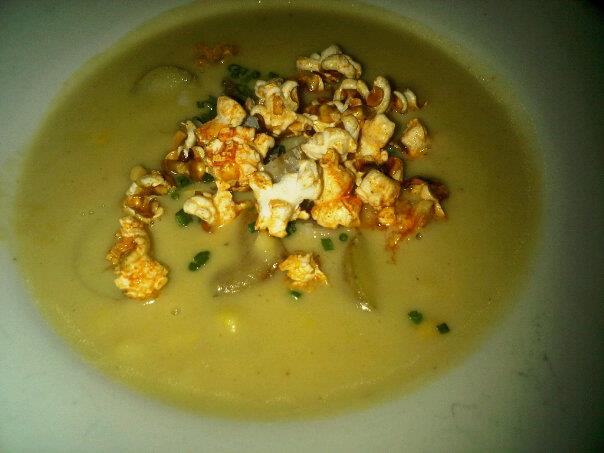
This is a past soup special: Smoked Whitefish Jalapeno Corn Chowder, with fingerling potatoes and topped with seasoned popcorn. It was similar to the Smoked Jalapeno Corn Chowder with Smoked Oysters they served at Soupstock 2012.

ob fish tacos
Oyster Boy makes a pretty mean fish taco…and fish tacos rule! The fish is crisp, juicy and has got nice, spicy flavour. The juicy, saucy goodness tends to leak all over your hands and you end up with sauce all over your face, but this is what tacos are about. Ask for some extra napkins and dig in. Enjoy them!

Steamed clams and mussels are both classic seafood favourites, and we order them here time and time again. The mussels are done three ways: classic garlic, white wine, parsley broth, a coconut curry broth, and a smoky tomato chorizo broth. I’ve tried all three. The coconut curry broth can be a nice change if you’re in a curry kind of mood, but you can’t go wrong with the classic. The clams are steamed in the classic garlic, white wine, parsley broth, and usually plump and juicy. (If you ask nicely you could try them in one of the mussel flavours.) Don’t forget to ask for bread to mop up that broth!

They serve whole steamed shellfish, lobster or crab (when it’s available). It’s so much cheaper to steam one of these bad boys at home, but you deserve a treat every now and then! The dungeness crab we had was fresh and perfectly steamed.

sturgeon ceviche ob

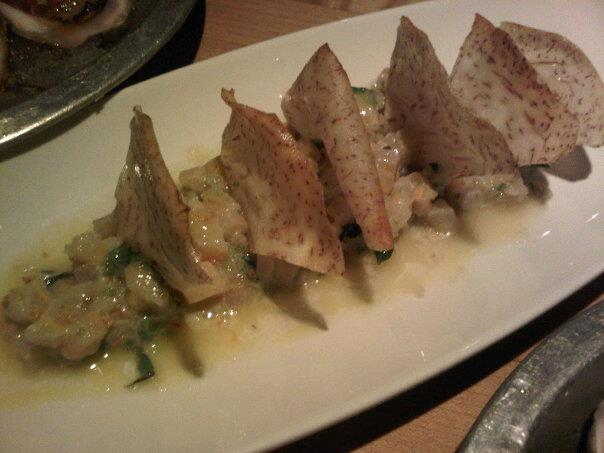
The Sturgeon Ceviche is divine. It’s a great starter, served with crispy taro chips.

ob fries

I love oyster boy’s thin-cut shoestring fries. They are to die for, and a great side to add to your meal. They come with a choice of chipotle, lime jalapeno aioli, or a curry sauce on a half oyster shell. 🙂 They also offer yummy onion rings, the size of your hand!

They’ve got other seafood favourites such as crab cakes and fish and chips (I’ve heard the fish and chips are really great), along with some tasty salads as well. They also serve pasta and non-seafood options. (I’m usually there for seafood.) Always check what the daily specials are because they are always AMAZING! They have some really creative delicious choices!

We always stop by late in the evening, so I’ve never had to wait for a table, although I’ve heard it gets crazy busy during prime meal times. Reserve a table to be safe.

I’ve hopefully inspired you to give this place a try. It’s one of my favourite restaurants and I hope you love it as much as I do.

Click here to visit their website. (FYI: I don’t think their menu is up to date.) Like them on Facebook!

Happy seafooding! xx

Turkey Pot Pie

I definitely found the right recipe at the right time. After making my first turkey for Passover/Easter, I had a ton of turkey left over and didn’t know what to do with it. I decided to freeze it. Leftover turkey will stay fresh in the refrigerator for 3-4 days, but freezing it will extend it’s shelf life by months. So, I packed it into neatly labelled ziploc freezer bags to use for future meal planning.

I came across a chicken pot pie recipe from My Healthy ‘Ohana, a blog full of yummy recipes (go have a look and try some of them). I thought turkey would work wonderfully with this recipe as well. It turned out to be a great way to use up leftover roasted turkey, and the recipe is not hard at all. I’m so proud of my first pot pie! 🙂

Turkey Pot Pie (or chicken)

Ingredients:

  • 1 medium sweet potato peeled and cubed
  • 2 medium carrots peeled and chopped
  • ~ 2 cups homemade turkey broth (or 1 can chicken broth)
  • 3 sprigs fresh thyme
  • 2 bay leaves
  • Half a large onion chopped
  • 1 tablespoon butter
  • 1/3 cup flour
  • 1/2 teaspoon salt
  • 1/2 teaspoon ground black pepper
  • 1 teaspoon paprika
  • 2/3 cups milk
  • ~ 3 cups of leftover roast turkey chopped into large cubes (you can substitute with chicken)
  • 1/2 cup frozen or canned peas
  • 1 9-inch pie crust (I was pressed for time, I used a pre-made crust)
  • 1 egg, beaten

IMG_6844


Preheat oven to 425 degrees.

Place the chopped carrots and sweet potato in a small saucepan, cover with broth, and add thyme leaves and bay leaves. I used homemade turkey broth I had made from my roast turkey bones. Cover and bring to a boil. Cook until the carrots and potatoes are just tender. It’s easy to overcook the sweet potatoes, you don’t want them mushy.

In a separate pan, fry onions in butter until translucent.

Add flour, salt, pepper, and paprika and cook for a couple minutes, until the onions are well coated and everything’s mixed together nicely.

Next, add the milk in and stir until the mixture becomes a thick paste.

IMG_6861


Remove the bay leaves from your pot of vegetables. Add the onion/flour paste to your vegetables and broth and continue cooking and stirring until the broth thickens to become a creamy sauce. (It doesn’t take long.) Fold in peas and leftover turkey (or chicken).

Place this mixture into a 9-inch pie dish. I used a round glass casserole dish that was a bit bigger than a pie tray, there was a lot of filling. You can also use individual ramekins if your want to make smaller pies. Sprinkle a bit of salt and pepper over the mixture before you put the crust over top.

IMG_6883

Cover your filling with pie crust, making sure to seal the edges well. Remove the excess crust. You can shape this extra crust into fun decorative shapes to make your pie look extra special. I had a lot of extra crust, so I made an edge around my pie…and a heart. Next, brush the top of your pie with the beaten egg and cut several vents in the top to let steam escape. You’re ready to bake!

Bake the pie for 20-25 minutes at 425 in the oven (or until the crust is golden and crispy). I baked mine for 25 minutes.

IMG_6911


I am so happy I tried this recipe. It was delicious! The sweet potatoes add a sweet creaminess that is really nice. My pie was done with one crust over top, but you can also use the same filling with two crusts. Line your pie tray with the bottom crust, fill, and then seal with the top crust. Play around with different spices too!

Enjoy! xx

A Healthy Alternative To Asian Fish Balls…And Why Your Fish Balls Should Be Homemade.

IMG_6178

I love Chinese fish balls (and beef balls, squid balls…all of them). After all, I am part Chinese. How could I not? I’ve grown up eating them in fish ball noodle soup, curried on bamboo skewers, barbecued, in hotpots…Asians use them everywhere! If you’ve been to Hong Kong, curried fish balls are a very popular street food. These stalls can be found all over, they’re sort of the Hong Kong equivalent to hot dog stands. I have to admit though, there’s something creepy about those seafood/meat balls and how rubbery they are. If you’ve ever accidentally dropped a cooked fish ball on the floor and seen how high it bounces off the ground…weird, right? And a lot of the time, they don’t taste very fishy at all. I never really questioned what I was eating, I just ate. I thought I’d do a little investigating on how Asian fish balls were made.

I found out that the bouncier the fish ball, the better. The rubbery bounciness actually has nothing to do with the ingredients of the fish ball. (Thank goodness!) It has to do with how long and hard the fish paste is slapped down repeatedly before being balled. I’ve seen women in Hong Kong marketplaces slamming big balls of fish meat on large wooden chopping blocks. Now I know why. To make their fish balls bounce and spring open upon being eaten!…I guess.

The rest of the answers I found are not so pretty. The whole fish ball fad dates back to to the 50’s in Hong Kong. They were made as a cheap, yet filling, snack food targeted towards the low to middle class population. Most fish balls you buy today are made with cheap fish and full of additives, such as MSG, and fillers. The cheaper fish balls consist of very little fish (sometimes less than 20%) and contain a large proportion of flour. Fish balls are mass produced in factories and made with fish that are not carefully selected. The fish portion of the fish balls is called surimi. What the heck is surimi?

Surimi is an Asian fish-based food product, and a common ingredient in Asian processed foods. I’ll let Wikipedia sum it up:

“Lean meat from fish or land animals is first separated or minced. The meat then is rinsed numerous times to eliminate undesirable odors. The result is beaten and pulverized to form a gelatinous paste. Depending on the desired texture and flavor of the surimi product, the gelatinous paste is mixed with differing proportions of additives such as starch, egg white, salt, vegetable oil, humectants, sorbitol, sugar,soy protein, seasonings, and enhancers such as transglutaminases and monosodium glutamate (MSG). If the surimi is to be packed and frozen, food-grade cryoprotectants are added as preservatives while the meat paste is being mixed. Under most circumstances, surimi is processed immediately into a formed and cured product.”

Surimi is a cheaper way for manufacturers to imitate the flavour and texture of a more expensive product. They take this tasteless gelatinous paste and then add the desired artificial flavour. Not so appetizing. I’ll have a real lobster tail, thanks.

So, on to making your own fish balls at home! I came across this recipe a couple weeks ago and thought it was amazing! I’ve stolen it from The Iron Cheftress, a blog I really like. You should check it out! It’s full of creative and healthy recipes amongst lots of other interesting stuff.

This recipe makes crispy pan-fried fish balls, with a bit of jalapeno spiciness. The best part is, they’re made purely of fish and a lot less carbs then store bought versions. They’re really yummy and would be a great meal or served as an appetizer. However, these are a dry and crispy fish ball, they’re not really meant for soup. I’m going to try making some real Asian-style fish balls in broth soon, but that’ll be a different recipe to share. 🙂

Crispy Fish Balls

Ingredients:

  • 1 pound of white fish (I used 2 frozen basa fillets I had in the freezer…a bit less than a pound)
  • 1/3 of a jalapeno pepper (use more or less depending on how spicy you like it)
  • 1 inch cube of fresh ginger
  • 1 1/2 inch piece of a thick carrot
  • 2 cloves of garlic (I’m sure I used more, I always use more with garlic)
  • 1 small shallot
  • 1 tablespoon of fish sauce (optional)
  • Salt (salt is unnecessary to salt frozen fish)
  • Ground black pepper
  • 1/2 cup of bran cereal, whole wheat flour, oat flour, whatever flour you’d like (I made these during Passover so I used matzah ball mix and it worked perfectly)

1. Process the fish until it becomes a paste, then transfer to a bowl. I used a food processor, but I’ve seen it done using the back of a chopper knife on a cutting board. (Probably more traditional Asian. If you don’t have a food processor then that will work.)

IMG_5917

2. Process jalapeno, carrot, ginger, garlic, and shallot. Add to the bowl of fish paste. (If you don’t have a food processor, you’ll have to samurai chop those veggies to bits.)

3. Mix it all together and season with black pepper (and salt if needed). Roll the fish paste into small bite-sized balls.

IMG_5935

4. If you are using bran cereal, grind it up. If not, have whatever flour you’re using in a small bowl. Roll each fish ball in your bran/flour until all sides are coated. I used matzah ball mix (for Passover purposes).

5. Heat a pan on medium heat and spray with cooking oil to keep the fish balls from sticking.

6. Once heated, place all your coated fish balls into the pan and keep rolling them around until they’re nice and crispy and a golden colour. It’s hard to make them a perfect ball. Mine kind of flattened out and became a little angular, and I may have over-browned them a bit…but they were delicious.

7. Serve them right away, with a spicy sauce. While they’re still nice and hot! I served mine with a sweet chili sauce and a horseradish ketchup (kind of like a hot cocktail sauce).

IMG_6180

So yummy! Enjoy! xx

White Velvet Soup: Cauliflower & Lima Bean Dream

IMG_6396

I was looking for a new and tasty soup to serve at my family Passover/Easter dinner. This recipe came from Green Kitchen Stories, a wonderful vegetarian food blog full of healthy and delicious recipes. I wanted something rich, maybe even creamy, with flavour. I came across this soup and decided it was the one. The gorgeous whiteness of all the ingredients makes things in the kitchen really pretty too. It has the yummy taste of cauliflower with the richness of the lima beans. 🙂 A hot bowl of thick hearty soup is such a comfort on a chilly night. Although the weather’s slowly warming up, I thought I’d take advantage of the last of our colder days and soup it up!

This is a really simple soup to make, and so super healthy! It’s a pureed soup of roasted white veggies and lima beans. These vegetables are full of health boosting nutrients and the lima beans are high in protein and loaded with fiber.

Ingredients:

  • 1 head of cauliflower
  • 2 medium onions
  • 6-8 whole cloves of garlic (I used 10…I love garlic)
  • 3 cups of cooked lima beans (about 2 cans)
  • 2 cups water
  • 2 cups vegetable broth
  • juice of 1 lemon
  • salt to taste
  • olive oil
  • paprika (or cayenne powder if you’d like a bit of spice)
  • Truffle infused olive oil (optional)

This soup is extra easy because all your cooking is done by the oven.

*If you are using dry lima beans, remember to soak them in water overnight. I soaked mine overnight and then boiled them the next day for an hour or so…or until they are soft. Even though the skins get wrinkly while soaking, leave them on. All the fibre is in the skin.

1. Preheat oven to 400 degrees and line two baking trays with parchment paper.

2. Wash and cut your head of cauliflower into small pieces and transfer to first baking tray. Drizzle olive oil over top and sprinkle with salt.

3. Peel the onions and cut into chunks. Transfer cut onions to second baking tray along with whole cloves of garlic. Drizzle olive oil over top and sprinkle with salt.

4. Put both trays into the oven and bake for 30-40 minutes or until the edges have become a nice golden colour.

5. (I was about to start blending in a blender when I remembered I had my hand blender!) Transfer the veggies into a pot and add cooked/canned lima beans, water, vegetable broth, and lemon juice. Now blend until smooth using a hand blender. If you don’t have a hand blender, you can do your blending in a regular blender (doing smaller batches at a time if it doesn’t all fit).

IMG_5915

6. The soup probably isn’t very hot, so heat it up a touch on the stove before you serve it. If you find your soup is too thick, you can add more water (or broth) until you’re satisfied with the consistency.

7. For something a little extra, mix 1 teaspoon of olive oil with 1/8 teaspoon of paprika/smoked paprika. Drizzle over the bowl of serve before serving. I drizzled truffle infused olive oil and sprinkled a little paprika over top.

Hope you love this!! xx

My Passover-Friendly Easter Dinner

IMG_6229

Long weekends for my family are an excuse to eat, eat, eat. This year, my parents asked me if I would like to cook dinner for the fam. I guess now that I’ve started this blog, I’ve become the designated chef. Don’t get me wrong, I was so excited about it!!! My first time cooking for my family (I mean a really well planned out meal), first time hosting a dinner in this apartment, and my first time cooking a turkey! I’ve actually never roasted a whole bird of any sort, so I was a little nervous. (I was praying it wouldn’t be dry. I hate dry turkey.) To make things more challenging, my boyfriend is celebrating Passover and isn’t eating leavened bread. So, I spent most of my free time searching for recipes and ideas for Passover-friendly options and putting my menu together. I ended up overlooking one thing. I made a cucumber and feta appetizer, and I was not serving dairy for Passover purposes (not to mix meat and dairy according to Jewish dietary laws). Totally overlooked that one…oops. 😦  But, I love a good challenge! We had a tiny table that couldn’t even hold all the food I had made, but it was a good meal and a fun time nonetheless.

My mother is the queen of turkey roasting. She’s perfected the art and has her own secret marinade she uses. Everyone says her turkeys are the best they’ve ever had. Delicious and so moist and juicy. (No pressure.) My mom always buys the biggest turkeys she can find. The last turkey she made was a 37 pound turkey the size of a lamb. I thought I’d be smart and buy an appropriately sized turkey so that we could finish it. In the end however, I guess I really am my mother’s daughter, I got so excited about trying new recipes I made twice as much food as I should have. I spent about 10 hours in the kitchen. Exhausting weekend!

Here is a list of what I prepared for the dinner. I’ll be posting all the recipes in the next few days.

To Start:
Cucumber Feta Boats. Recipe here.
Kale & Lettuce Salad (with a mixture of other veggies) in a Tahini Dressing
Cauliflower & Lima Bean Soup. Recipe here.

My Mains:
ROASTED TURKEY (obviously) + gravy + cranberry sauce. Recipe here.
Roasted potatoes (cooked with turkey)
Matzah Stuffing
Crispy Fish Balls. Recipe here.
Roasted Asparagus and Caper Berries
Braised Coconut Spinach & Chickpeas Over Sweet Potato

Dessert:
Maple Baked Apples

Cucumber Feta Boats

IMG_6084

While searching for things to serve at my Passover/Easter family dinner, I came across a really simple and deliciously refreshing recipe for cucumber feta boats on Pinterest. (Although it totally slipped my mind that I was trying not to serve dairy for the sake of the Passover celebrators. They had to avoid this dish.) They are quick to make and a yummy vegetarian appetizer. You could probably play around and make different variations of the filling too.

IMG_6081

Cucumber Feta Boats
I used a recipe from bitedelite.com

Ingredients:

  • 2 cucumbers
  • 2 oz of crumbled feta cheese (I used about 70-80 grams of crumbled garlic & herb feta, half of a small 150 gram container I bought)
  • 1/4 teaspoon salt, or to taste
  • 1 teaspoon fresh dill, chopped (use parsley or a different spice if you like)
  • Ground black pepper, to taste

IMG_5997

1. Wash cucumbers and cut them in half lengthwise.

2. Using a spoon, scrape the seeds out of all 4 halves. You’re left with 4 canoe-like cucumber halves.

3. Cut a small strip off the bottom of two of your cucumber halves, so that they can sit on a flat surface without rocking back and forth. These are your two cucumber boats.

4. Dice the remaining two cucumber halves. Put them in a bowl and mix in feta, salt, dill, and pepper.

IMG_6011

5. Divide the mixture between the two boats, carefully spooning it in.

IMG_6018

6. Slice the boats into 1 or 1 1/2 inch pieces.

Ready to serve! xx