Cranberry Sauce Recipe

It’s so easy to make your own delicious cranberry sauce! No preservatives like the store-bought kind, and it doesn’t plop out of the can…still in the shape of a can.

I made mine to go along with a roasted turkey. It turned out to be wonderful! You could even use it as a jam or jelly.

IMG_5900

Cranberry Sauce

Ingredients:

  • 1 1/2 cups of fresh or frozen cranberries
  • 1/2 cup orange juice (unsweetened)
  • 2/3 cup sugar
  • 1/4 teaspoon cinnamon
  • 1/8 teaspoon kosher salt

Bring all the ingredients together in a small saucepan. Bring it to a simmer. Most recipes I’ve looked at say to simmer for 20 minutes. I found the cranberries still looked quite solid. I had lots of time while my turkey was cooking, so I left the cranberries lightly simmering on low for about an hour, and sort of smashed the berries up with a wooden spoon.

It was exactly the texture I wanted. A perfect jelly. Totally worth whipping this up quickly, and the cinnamon adds a lovely touch of spice.

Middle Eastern Delight: Lentil and Split Pea Soup

Lentil soup should be in every cook’s repertoire. What’s more comforting than a steaming hot bowl of this fragrant hearty soup? It also doesn’t cost much to make and is good for you! Lentils are low in calories and high in nutrition. They are full of both protein and fibre and are said to help lower cholesterol, stabilize blood sugar,and improve heart and digestive health. Lentil soup is one of my Middle Eastern favourites! I used chicken broth, but this can be vegan friendly by using vegetable broth instead. 🙂

IMG_4667

If you’re from Toronto and you like Middle Eastern food, you must have heard of Jerusalem Restaurant. Established in 1971, it was the first Middle Eastern restaurant established in the city and is said to be one of the best. I remember going there as a child with my family. I love their lentil soup, and when I came across the Jerusalem recipe in the paper I figured it was about time I made this soup for myself. (Why have only a bowl, when I can have a whole POT?) I used the recipe as a guideline, but changed a few things here and there. For starters, I decided to add split peas. I also love split pea soup, so I figured combining both would be twice as good. I also chose to do it in the slow cooker, but you can totally make this in a pot on the stove if you don’t have a slow cooker.

IMG_4610

Middle Eastern Lentil & Split Pea Soup

Ingredients:

  • 3 tablespoons extra virgin olive oil
  • 1 small onion, chopped
  • 3 cloves garlic, minced
  • 3/4 cup green lentils
  • 3/4 cup yellow split peas
  • 1/2 cup basmati rice
  • 8 cups chicken broth (I made my own stock from scratch. You can substitute with chicken bouillon powder or store bought broth.) *Vegan option: use vegetable broth
  • 1/2 teaspoon salt (or to taste)
  • 1/4 teaspoon black pepper
  • 1/4 teaspoon ground cumin
  • 2 tablespoons chopped parsley
  • 1 tablespoon lemon juice (I used fresh lemons)

First, saute the chopped onions and garlic in a pan with the olive oil, until lightly browned.

IMG_4616

Rinse the lentils, split peas, and rice under cold running water in a sieve.

IMG_4619 IMG_4623

Put the sauteed onions, along with the rinsed lentils, rice, and split peas into the slow cooker (or pot) and cover with 8 cups of chicken broth.

IMG_4632 IMG_4635

I set the slow cooker for 8 hours on low. (If you’re going to try it in a pot on the stove, you could probably bring to a boil and then simmer for an hour or so.) You want to cook until the rice, lentils, and split peas start to kind of dissolve. The soup becomes more mushy and creamy. If its not as creamy as you want it, let it cook for longer and break apart a bit more. (You can always add a bit more broth if it becomes too thick.)

IMG_4650

I waited to add the rest of the ingredients near the end (at around 7 hours). Add the salt, pepper, ground cumin, and chopped parsley. You can add more or less of things. Taste it and adjust to your liking! Let the soup continue cooking for the remaining time set on the cooker. I find the longer you cook it, the better it is. An extra hour doesn’t hurt. (If you’re making this on the stove, I’d say stir in the remaining ingredients and let it simmer for another 5 or 10 minutes.)

IMG_4660 IMG_4661 IMG_4664

Mix the lemon juice in just before you serve. Always serve with lemon wedges! The yummiest thing about lentil soup in squeezing in the extra lemon juice. I love how the tartness of the lemon tastes with the flavour of the soup. So delicious!

IMG_4670

Enjoy! xx

Springtime Sugar Cookies: A Healthier Recipe

IMG_5413

Birthday party tonight. Springtime is coming. I want to bake. Those are enough reasons to dig out the cute springtime cookie cutters I bought last spring, that were never used, and bake some cookies! I didn’t have a lot of time, so I wanted a simple recipe. Sugar cookies are really easy to make and don’t require many ingredients. Looking up some recipes, I noticed that classic sugar cookies are not particularly health-friendly. They’re mostly made of flour, lots of butter, and lots of sugar. I decided to try doing a version that’s a bit healthier. I switched most of the flour for whole wheat flour and didn’t use as much butter. I used 3 tablespoons of butter, as opposed to the 1 cup of butter in most recipes. I also used brown sugar, and less of it. I browned the butter and added a bit of spice to the cookies, which I think also cut some of the sweetness. I passed on the colourful, sugar-loaded (but so pretty) royal icing and opted to do just a light sprinkle of sanding sugar over top. I still got the springtime pastel colours I wanted!

Get baking! Spring is here!

Spiced Browned Butter Sugar Cookies

IMG_5340

Ingredients:

  • 1 cup whole wheat flour
  • 1/2 cup all purpose flour
  • 1 teaspoon baking powder
  • 1/4 teaspoon salt
  • 1/4 teaspoon cinnamon
  • 1/4 teaspoon nutmeg
  • 3 tablespoons butter
  • 1 tablespoon sunflower oil
  • 1 large egg
  • 1/2 cup brown sugar
  • 1/2 teaspoon vanilla extract
  • coloured sanding sugar/sugar crystals to sprinkle over top

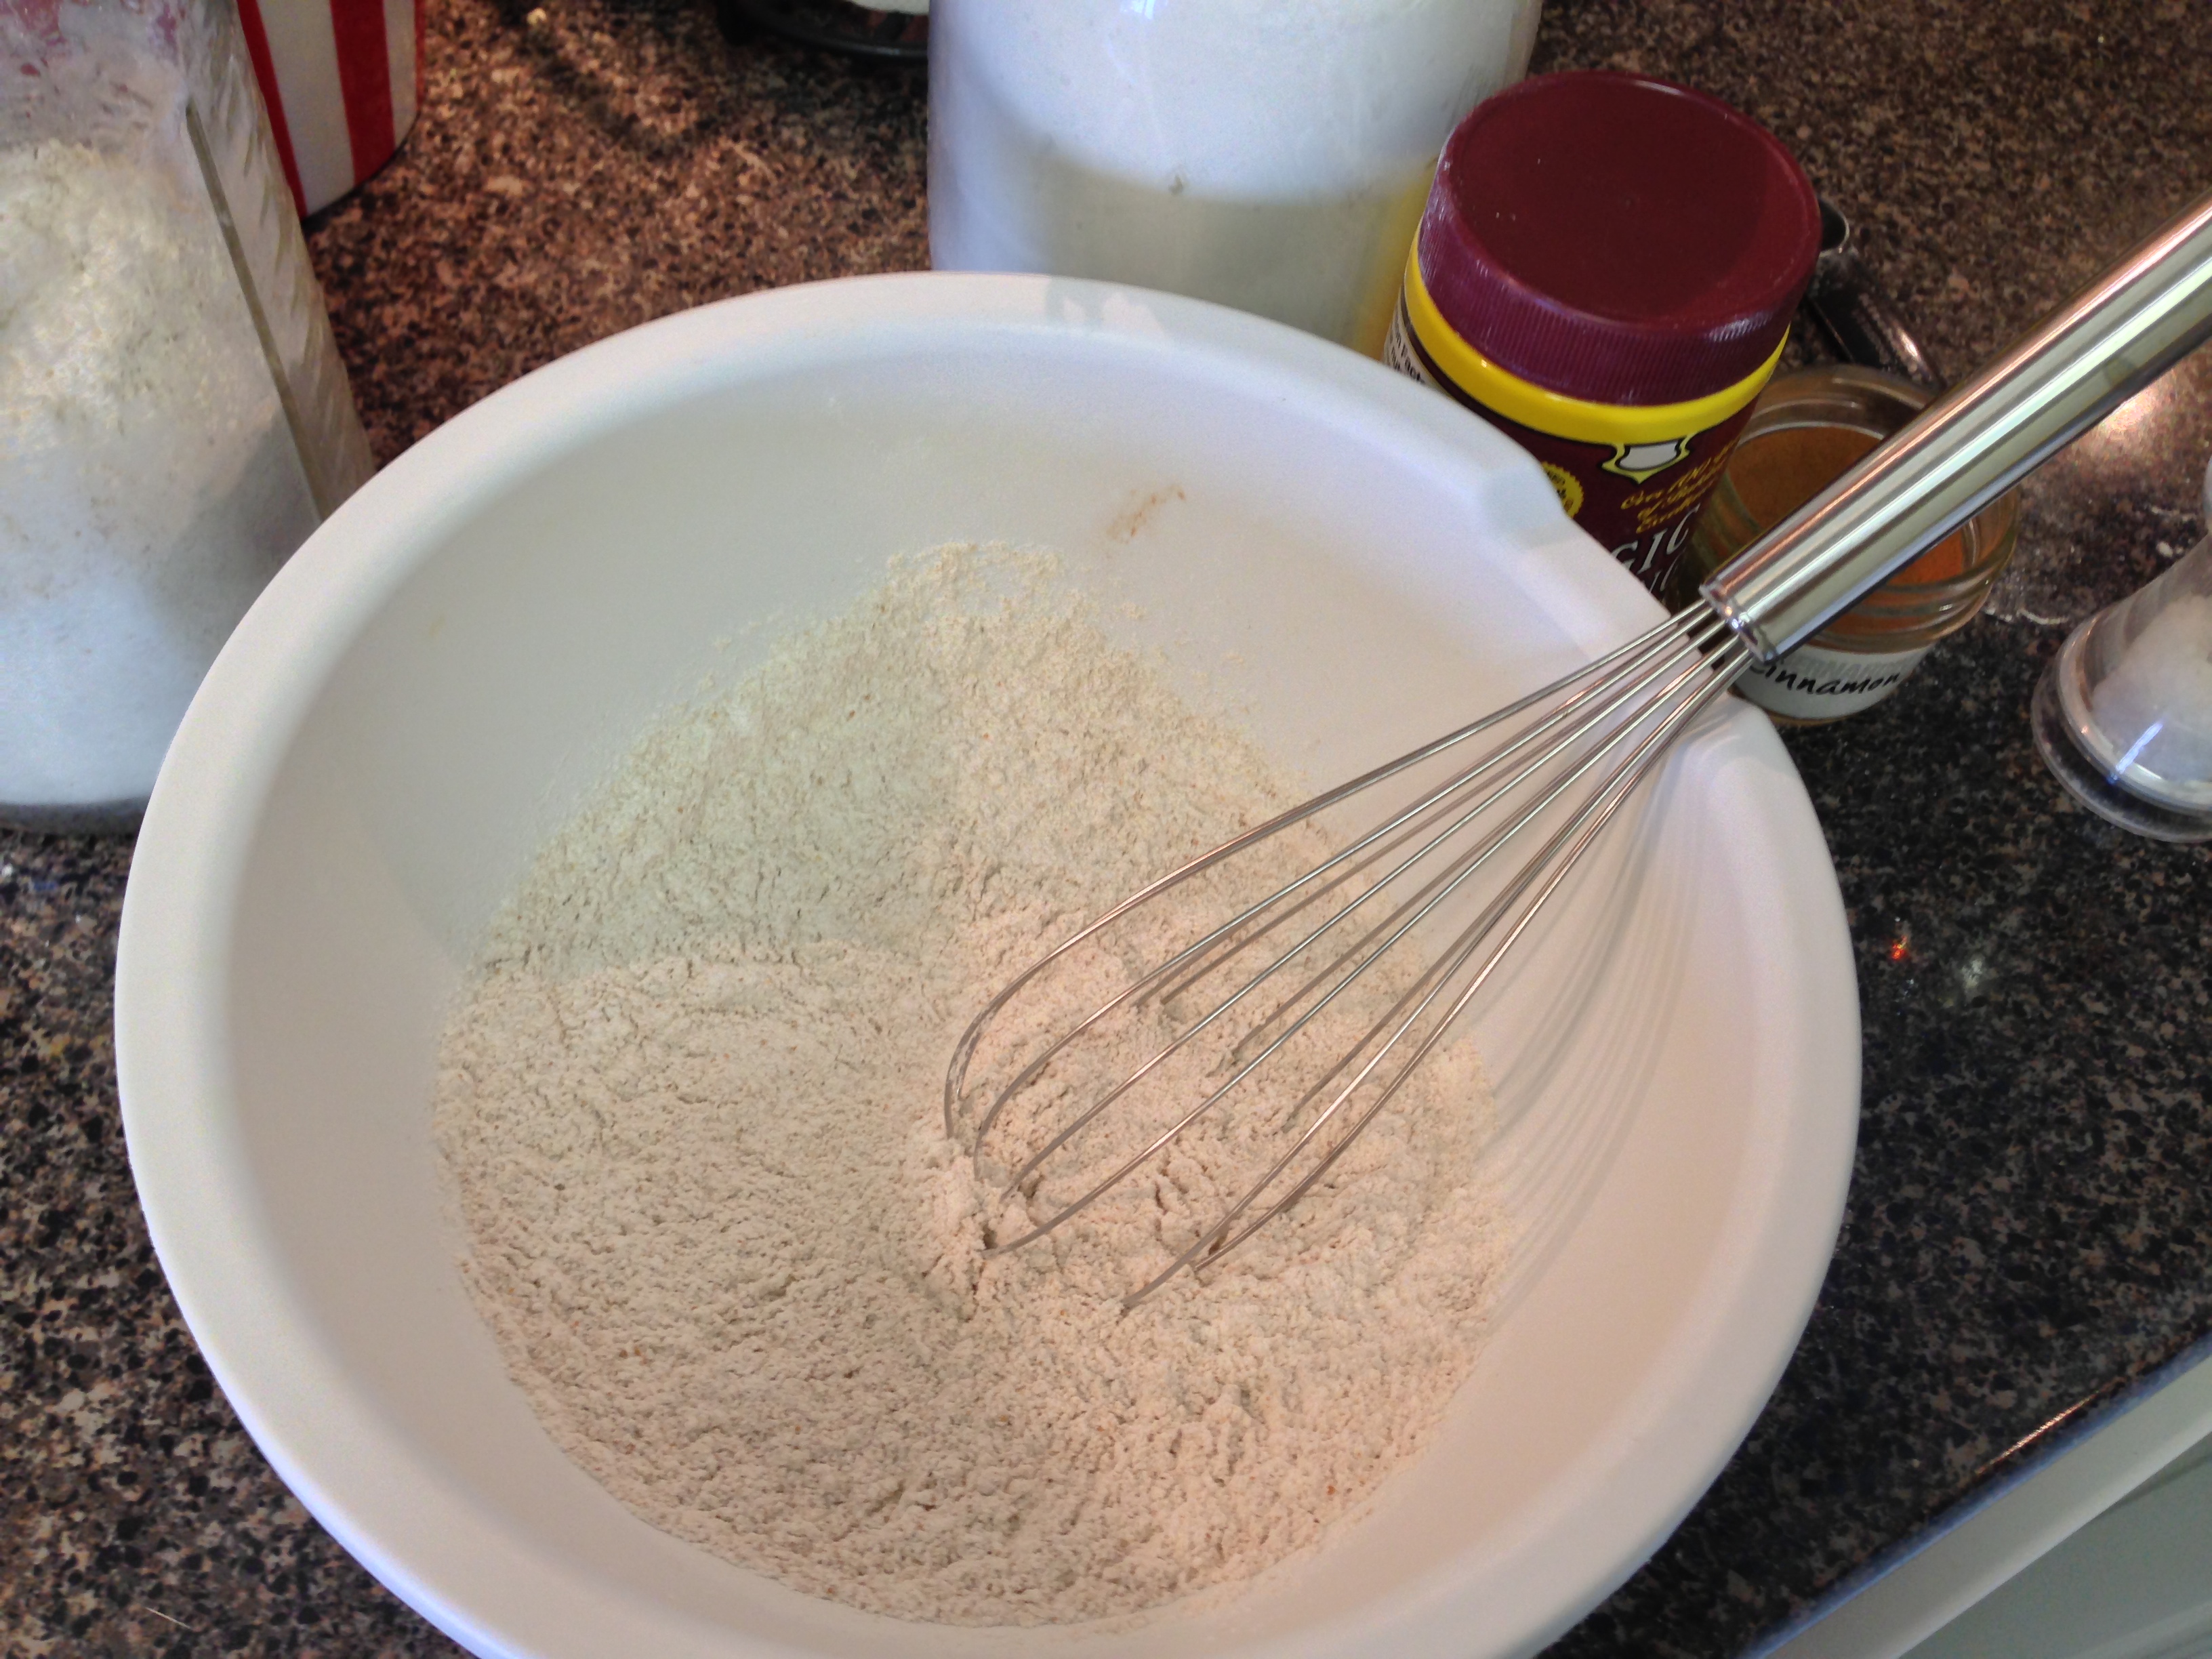
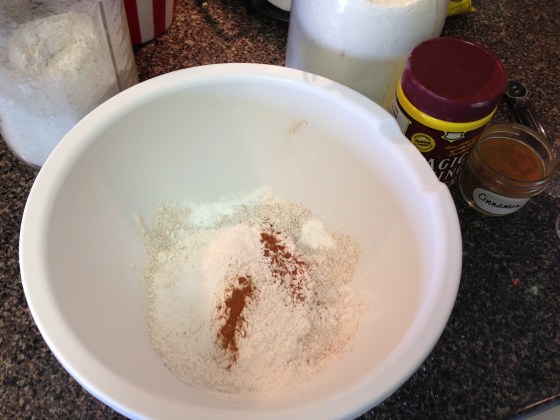
In a medium-sized bowl, mix both flours, baking powder, nutmeg, cinnamon, and salt together. Set aside.

IMG_5342 IMG_5347


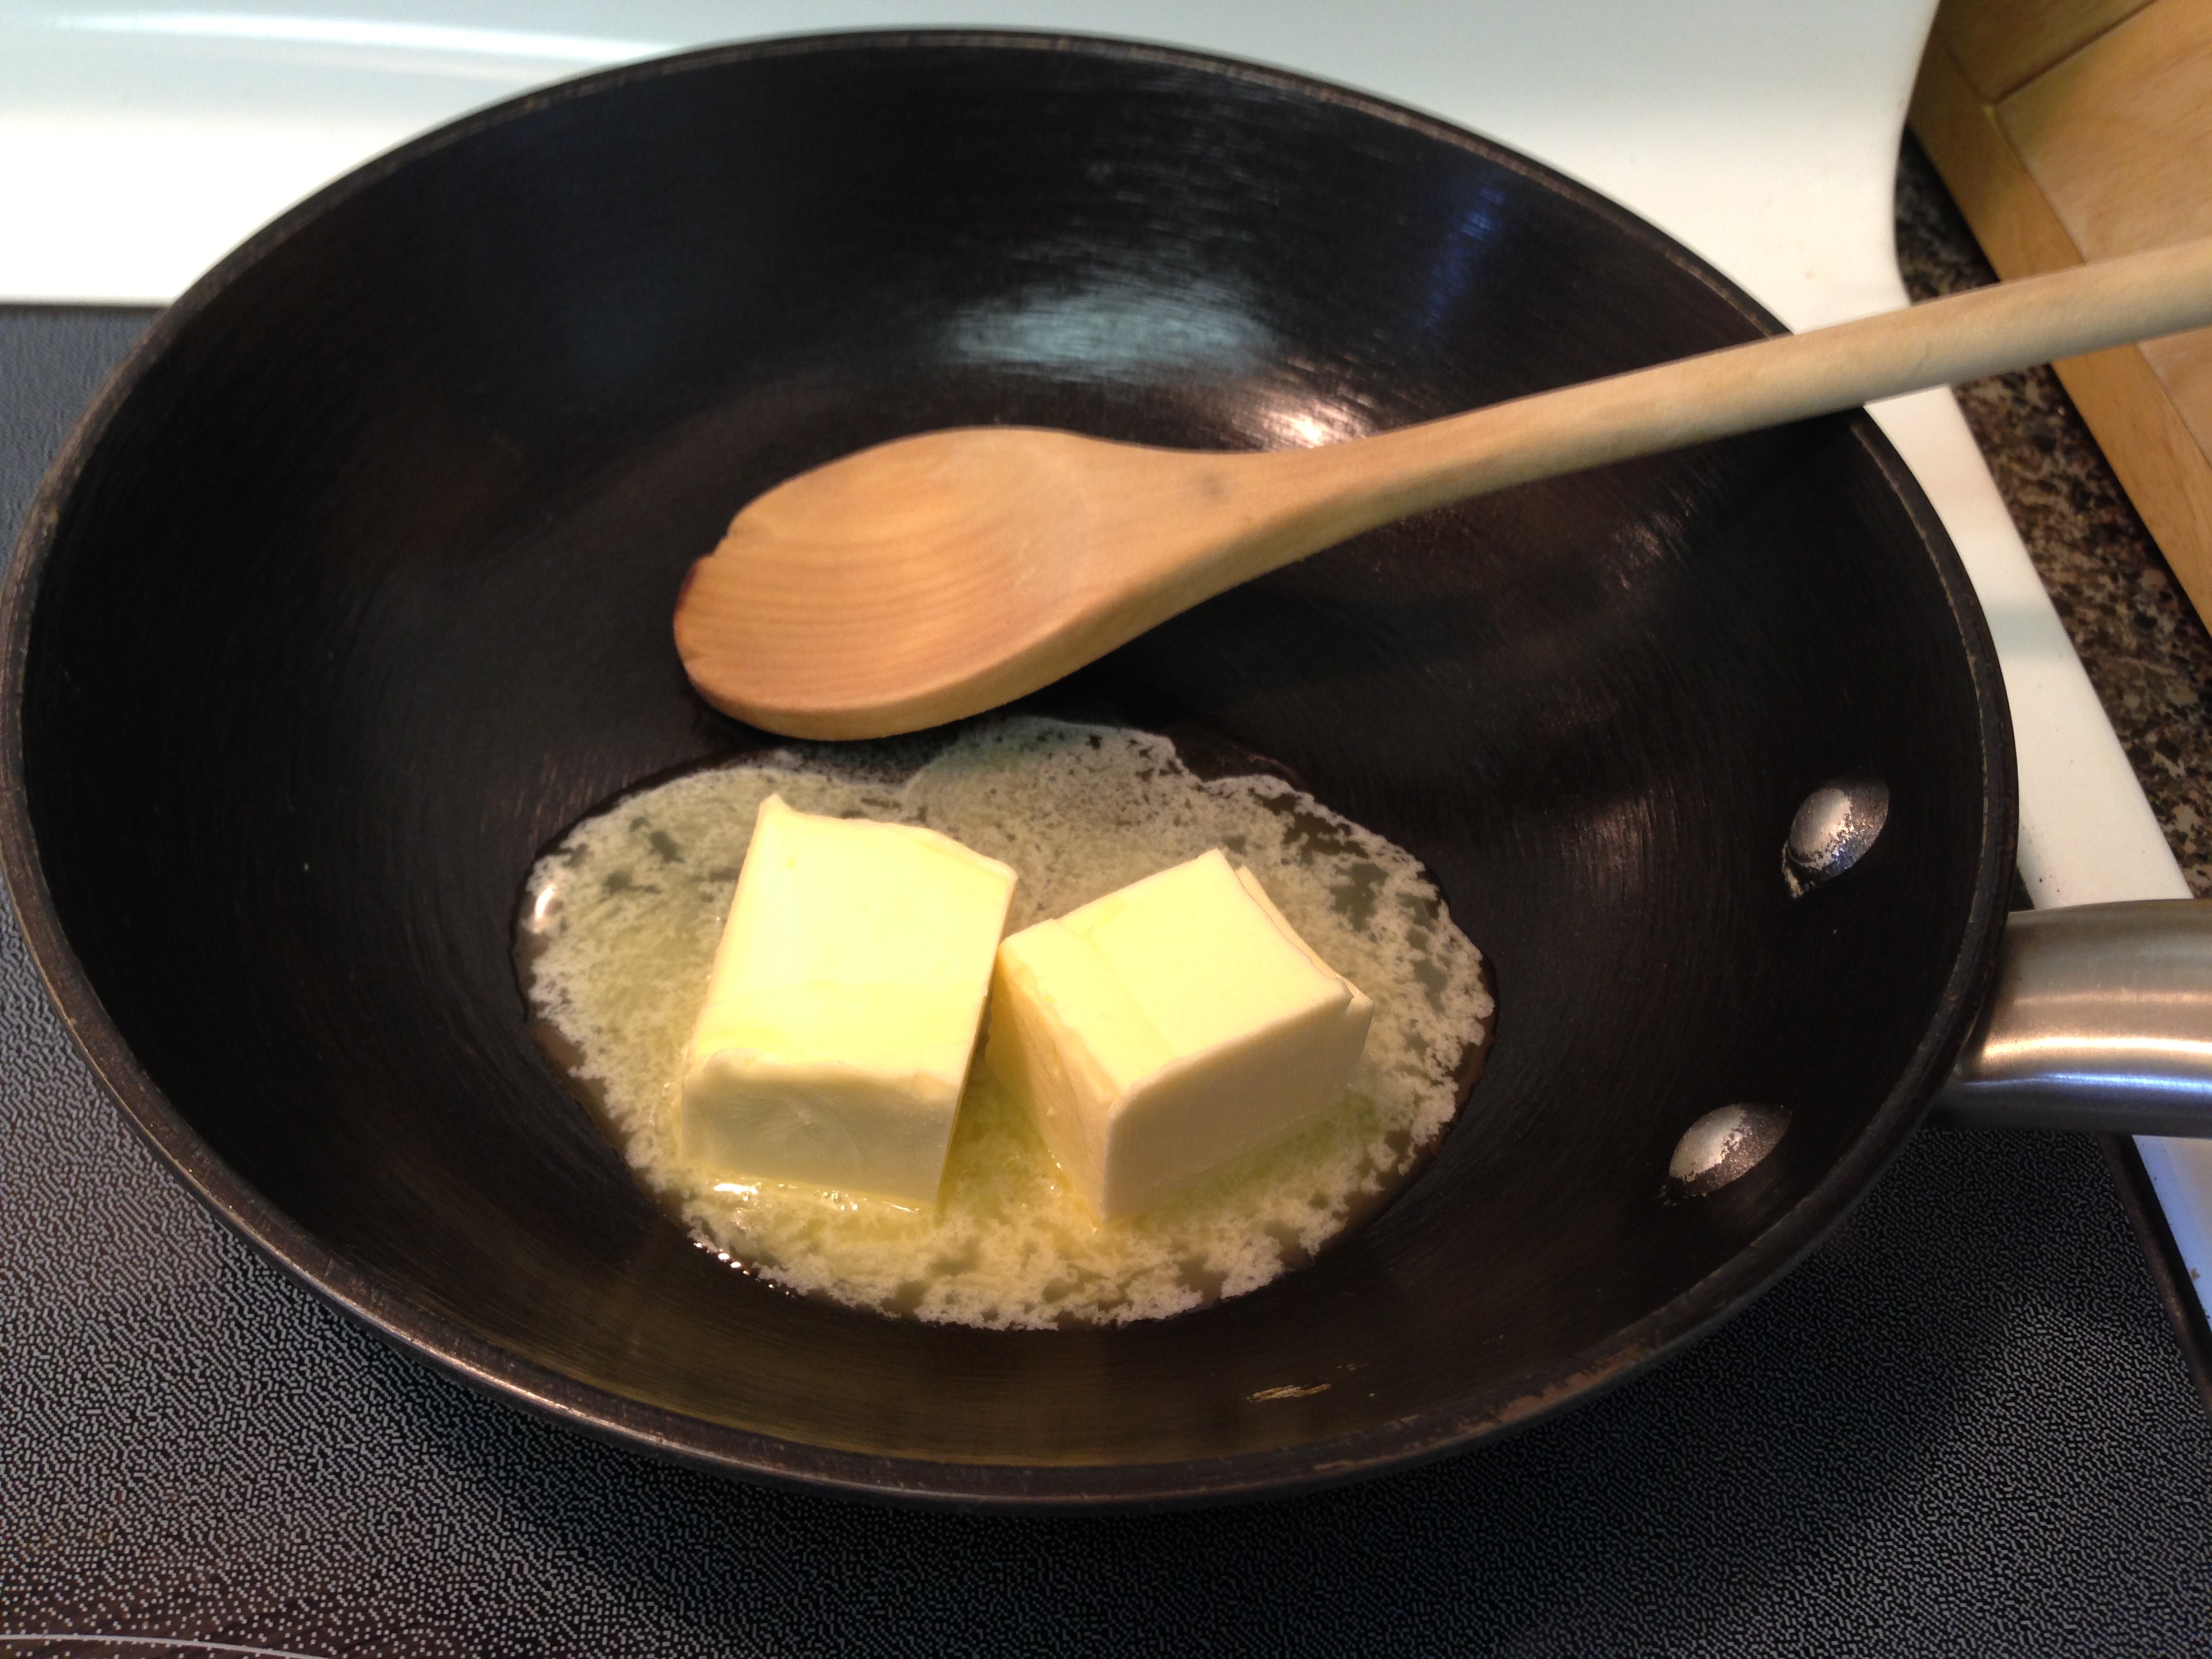
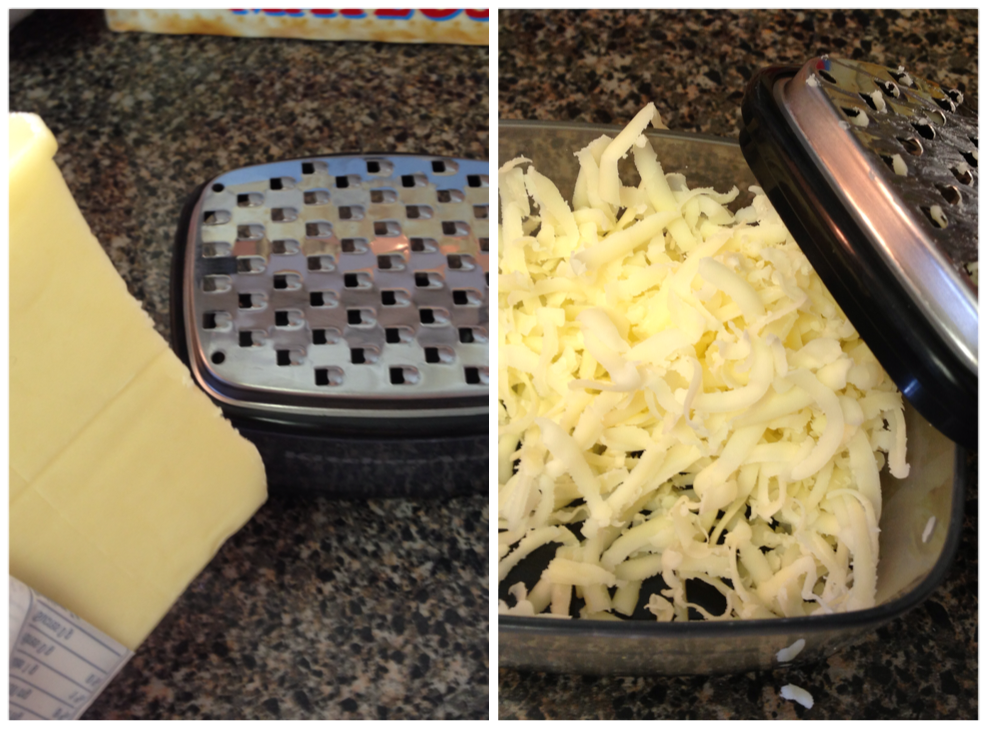
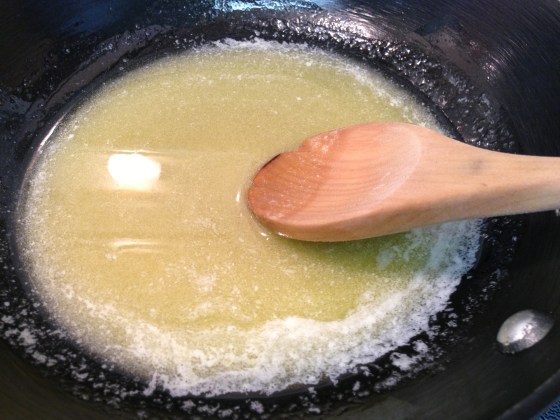
Now you’re going to brown the butter. Do this in a small skillet or pan on low heat. Keep stirring until fragrant and you can see it has become a slight light brown colour. It may take a few minutes (1-3). Don’t take your eyes off it, you don’t want it to burn. I love that buttery smell!

IMG_5348 IMG_5352 IMG_5364


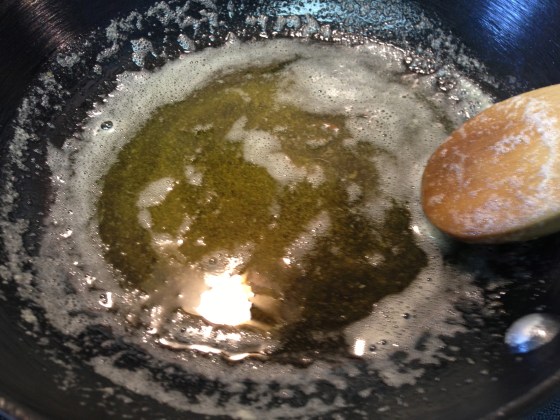
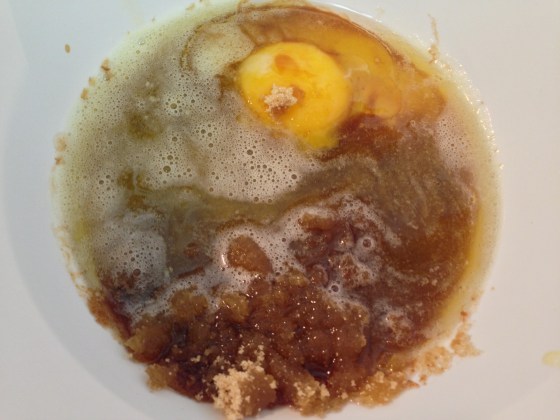
When your butter has slightly browned, remove it from the heat and set it aside to cool. Once it has cooled off, use an electric mixer to mix the browned butter together with the egg, oil, brown sugar, and vanilla extract. Mix until well blended.

IMG_5367


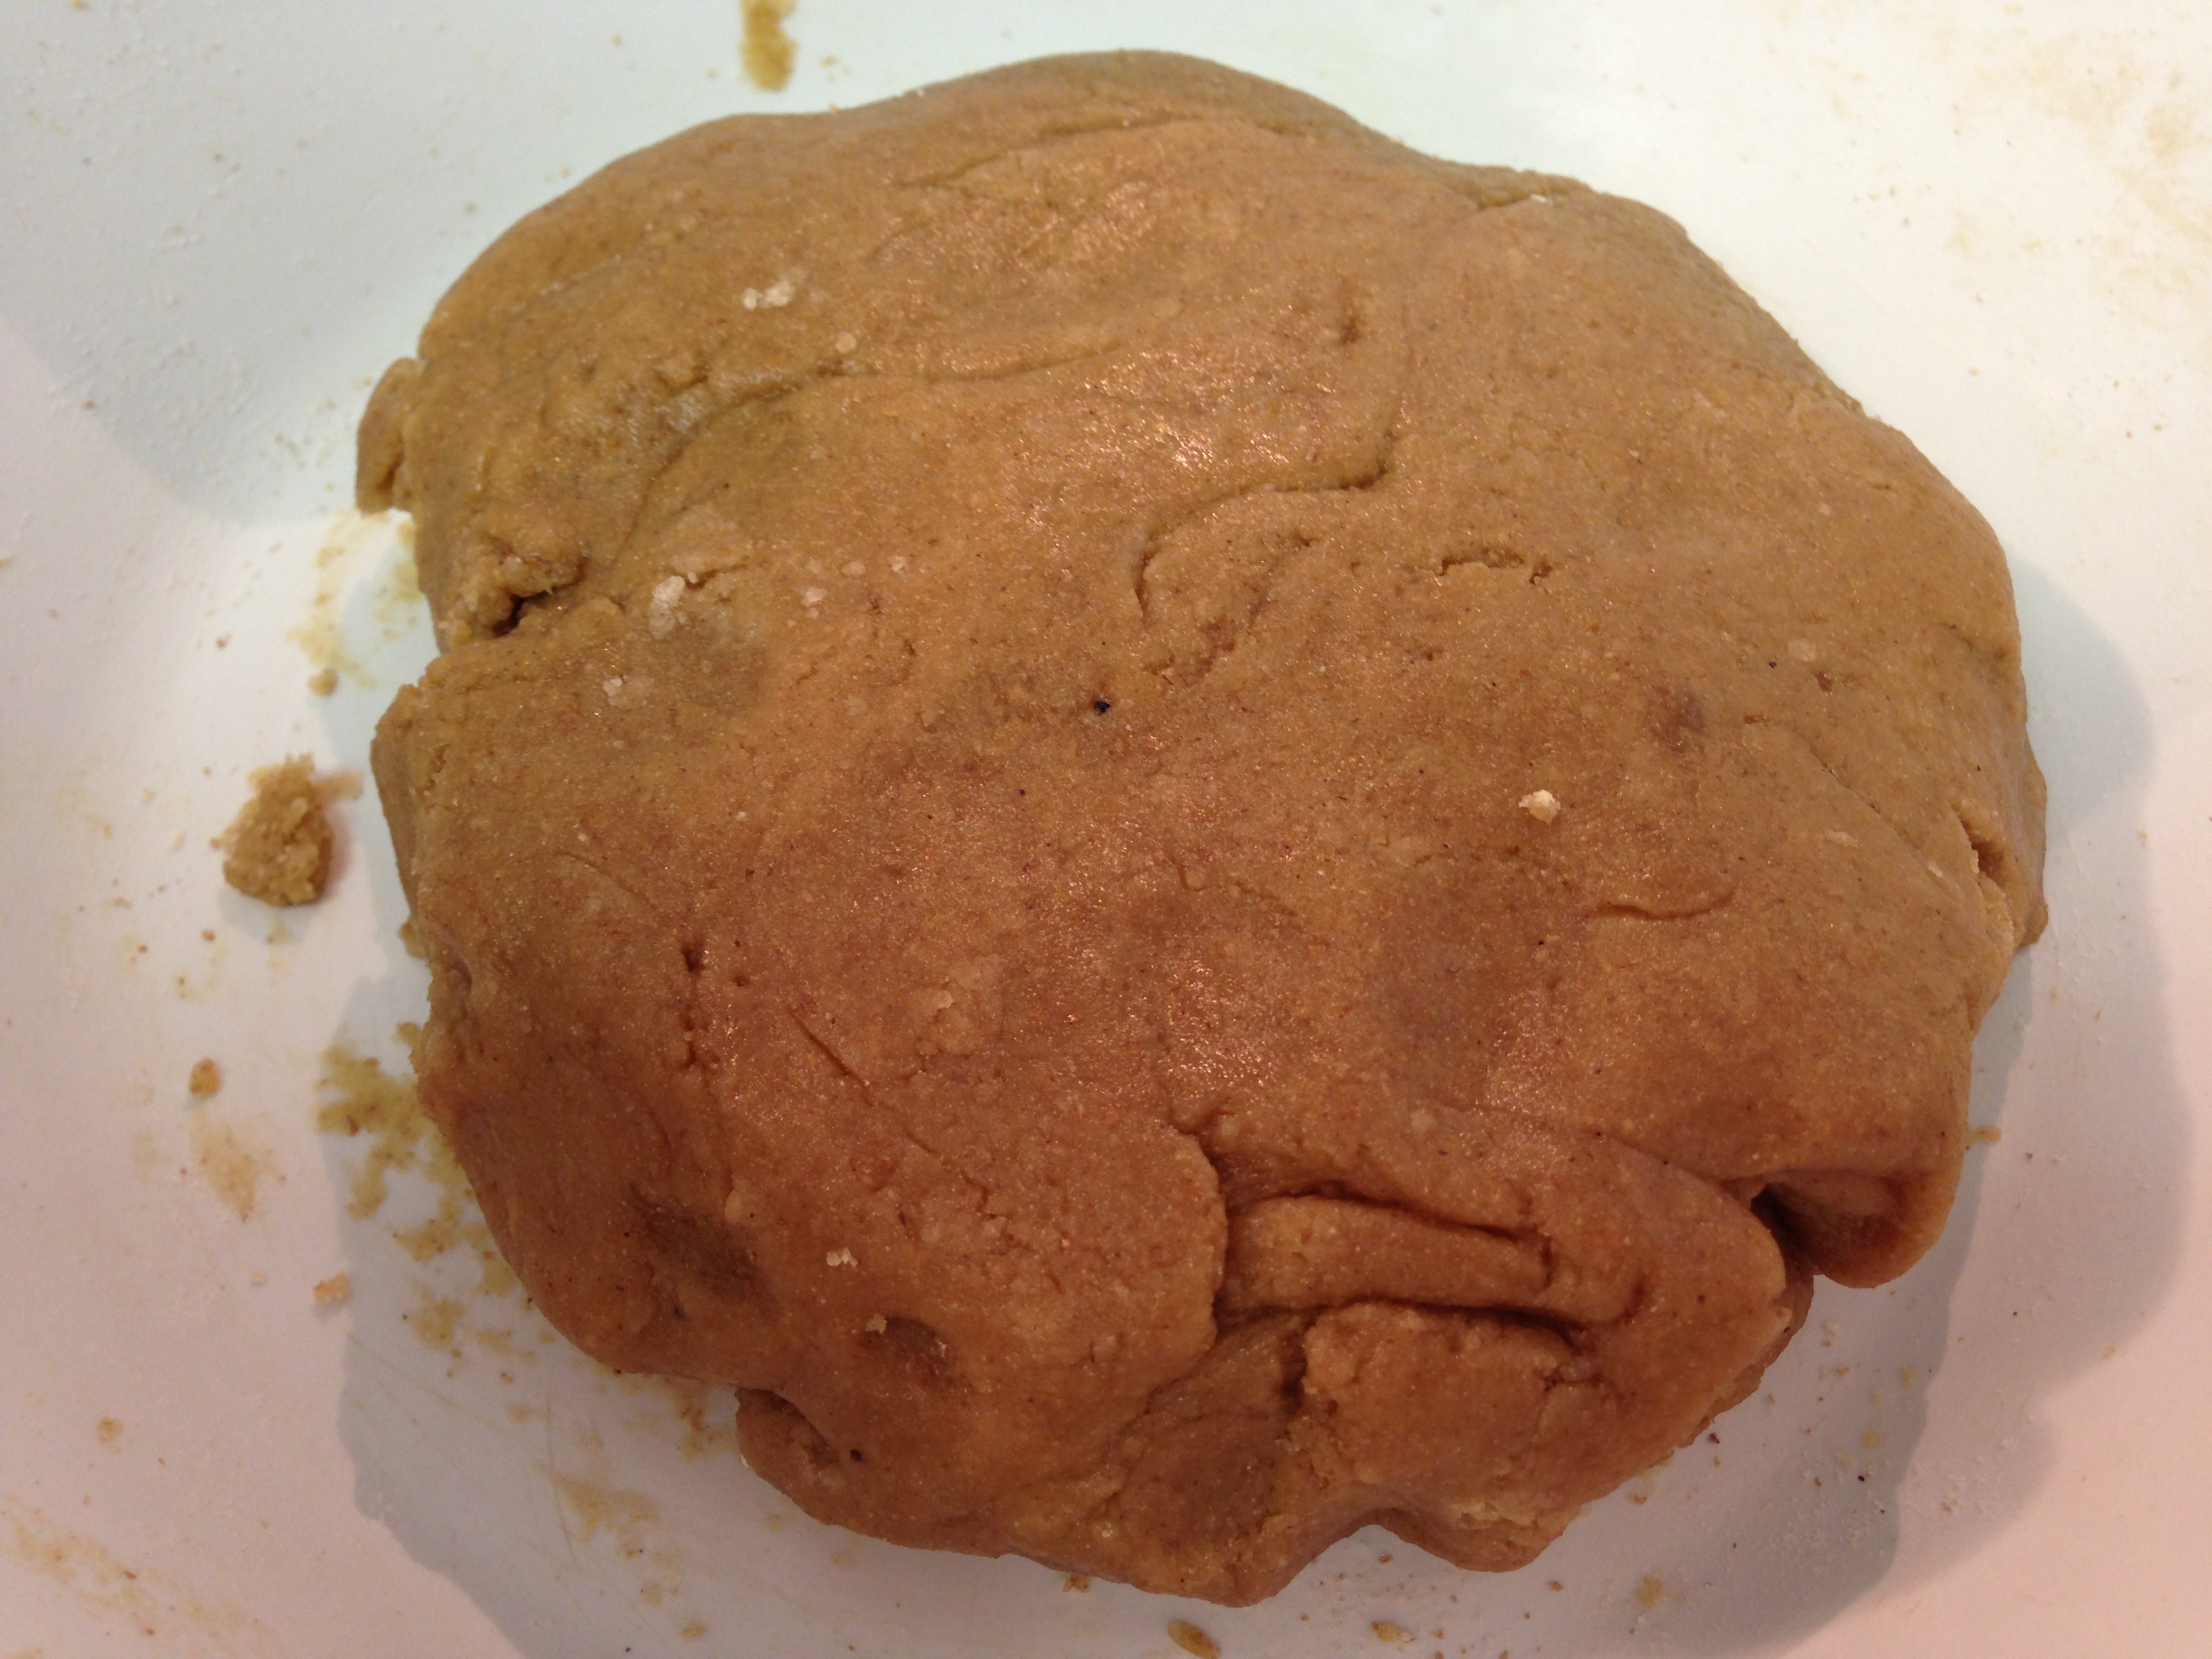
Add the wet mixture to your flour mixture. Mix on low speed until it’s combined. (I started using my hands.)

IMG_5368 IMG_5372


Using your hands, flatten the ball of dough into a disc shape, wrap in plastic wrap and refrigerate for at least an hour (you can leave it for up to 2 days).

IMG_5374


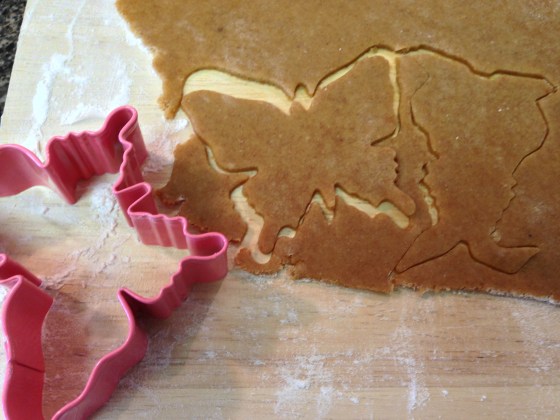
When done refrigerating, preheat your oven to 350 degrees, and remove the dough disc from the fridge. Line two baking sheets with parchment paper. On a lightly floured surface, roll out your dough. I made mine pretty thin. 1/8 of an inch is usually pretty standard.

IMG_5388


FYI, you don’t need as much flour as in the picture above. I got a little flour-happy. Too much flour will dry your dough out and cause cracking.

IMG_5389


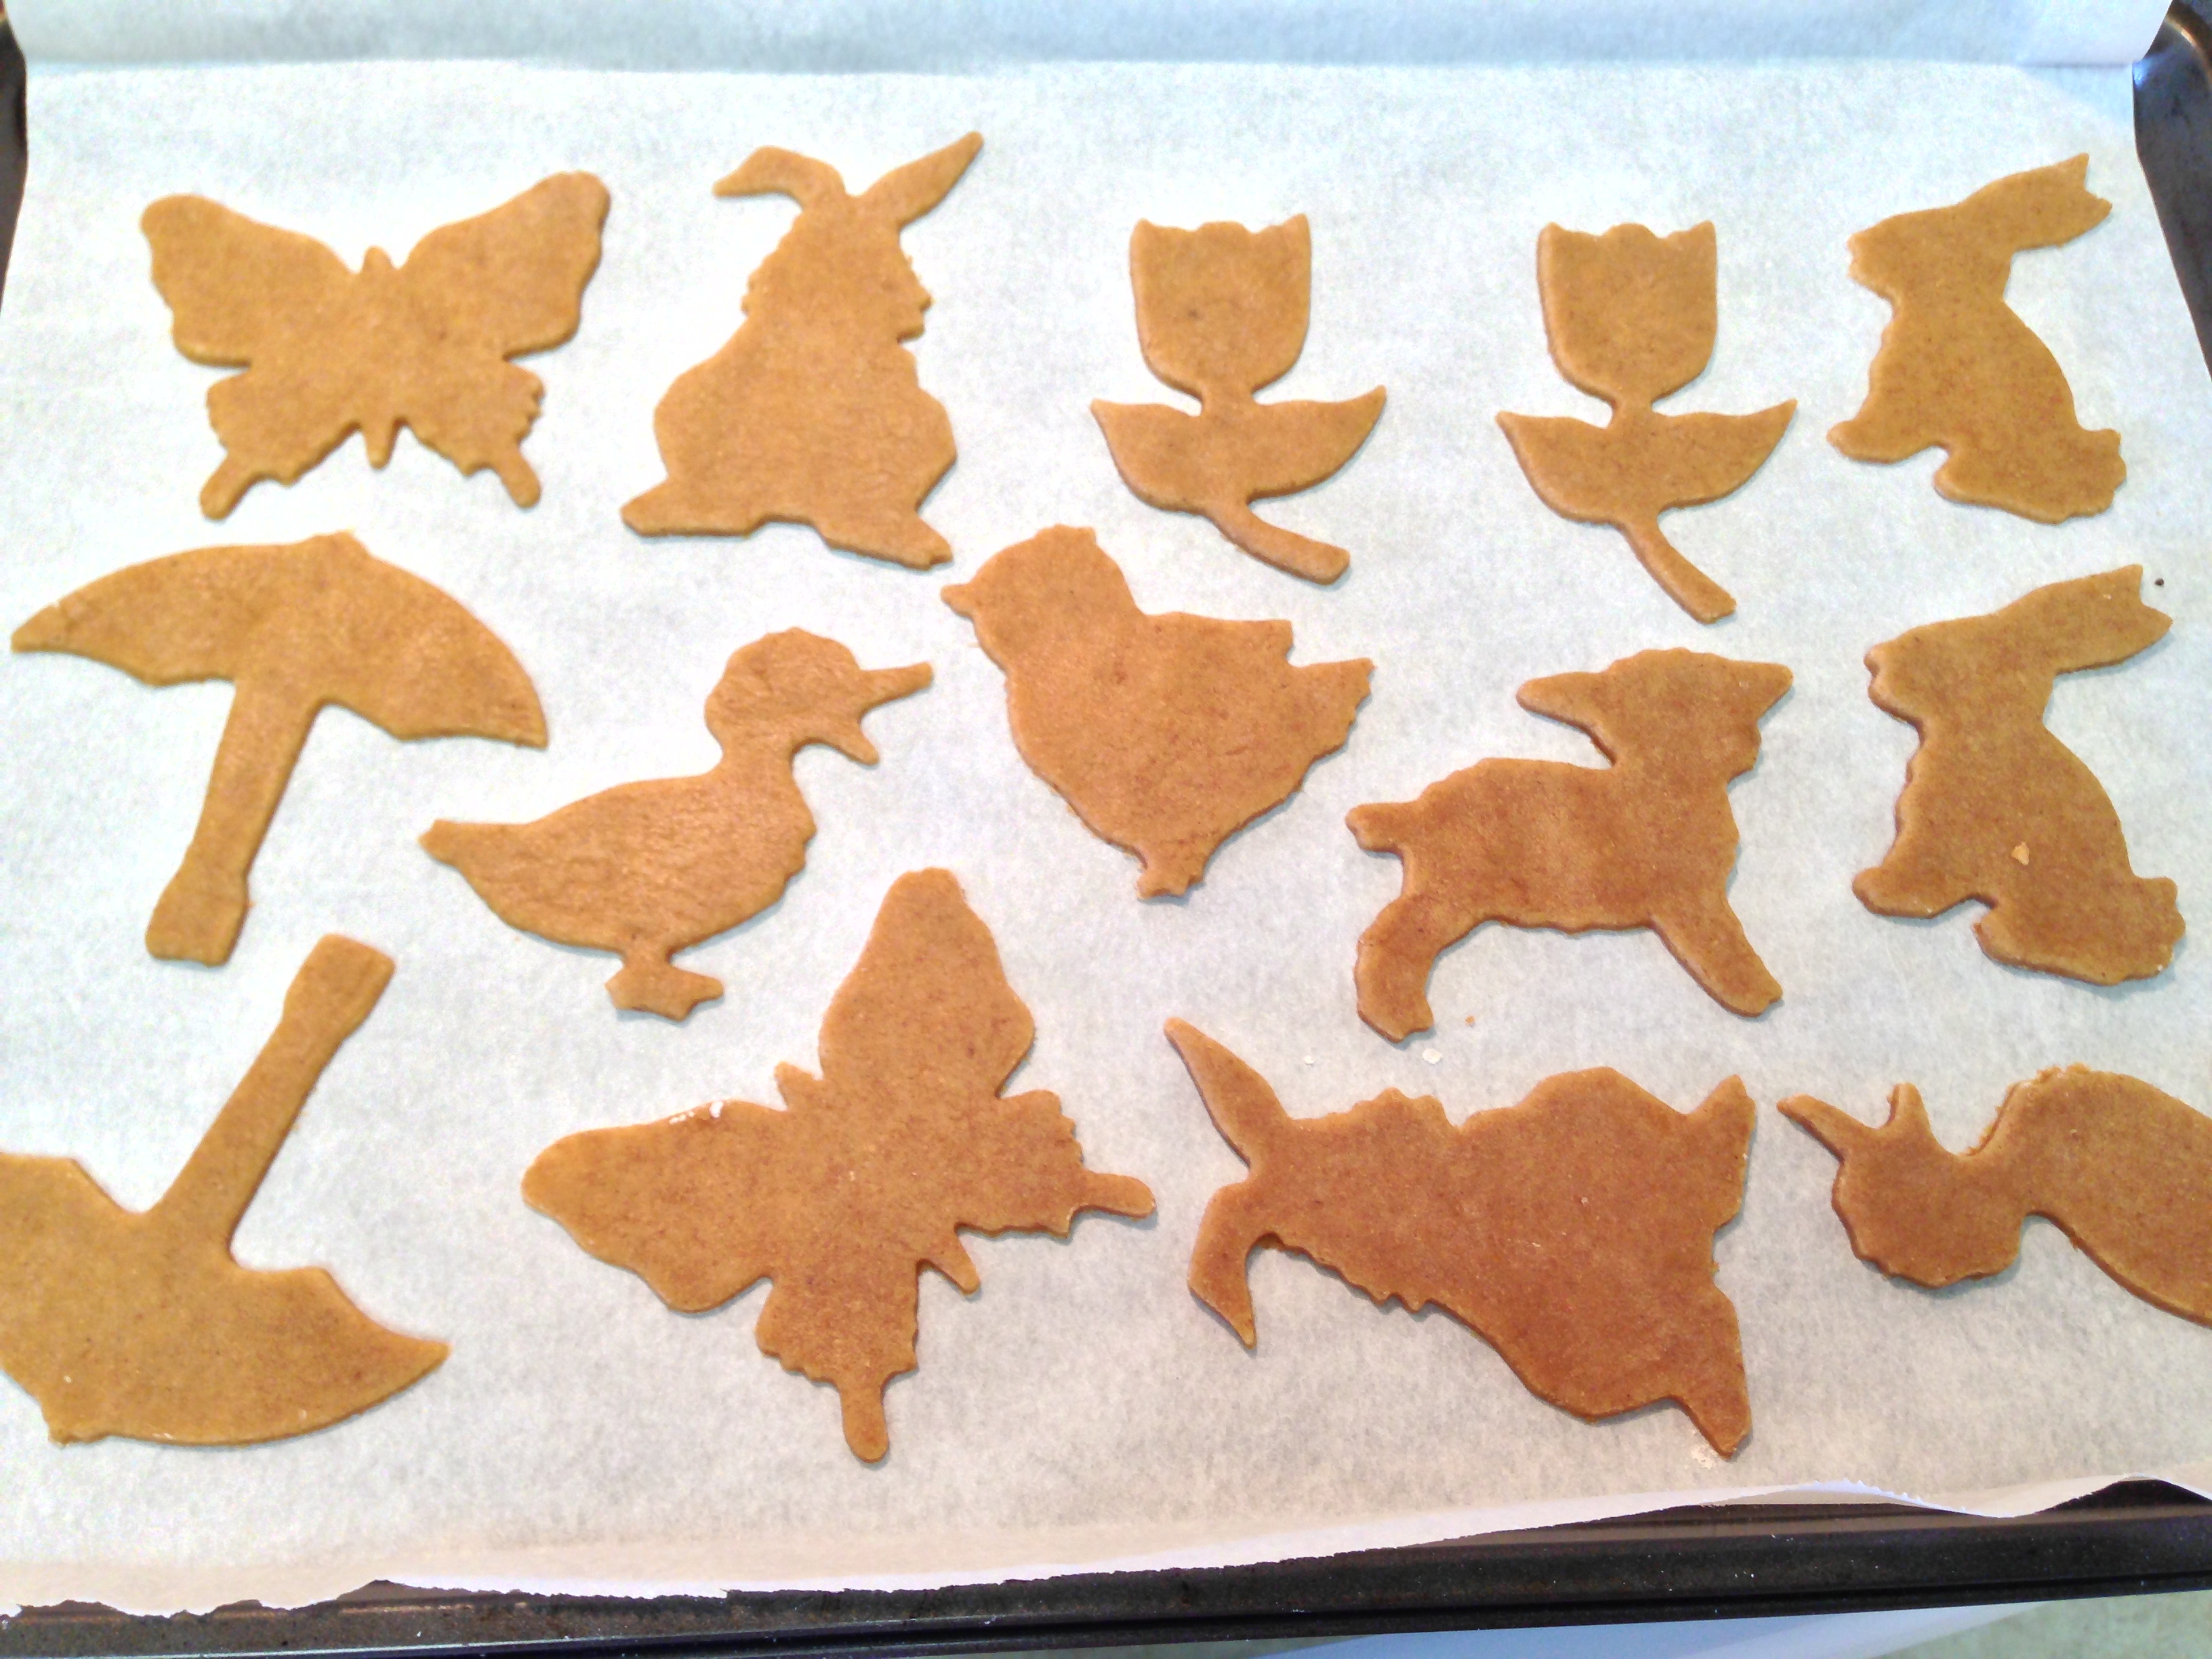
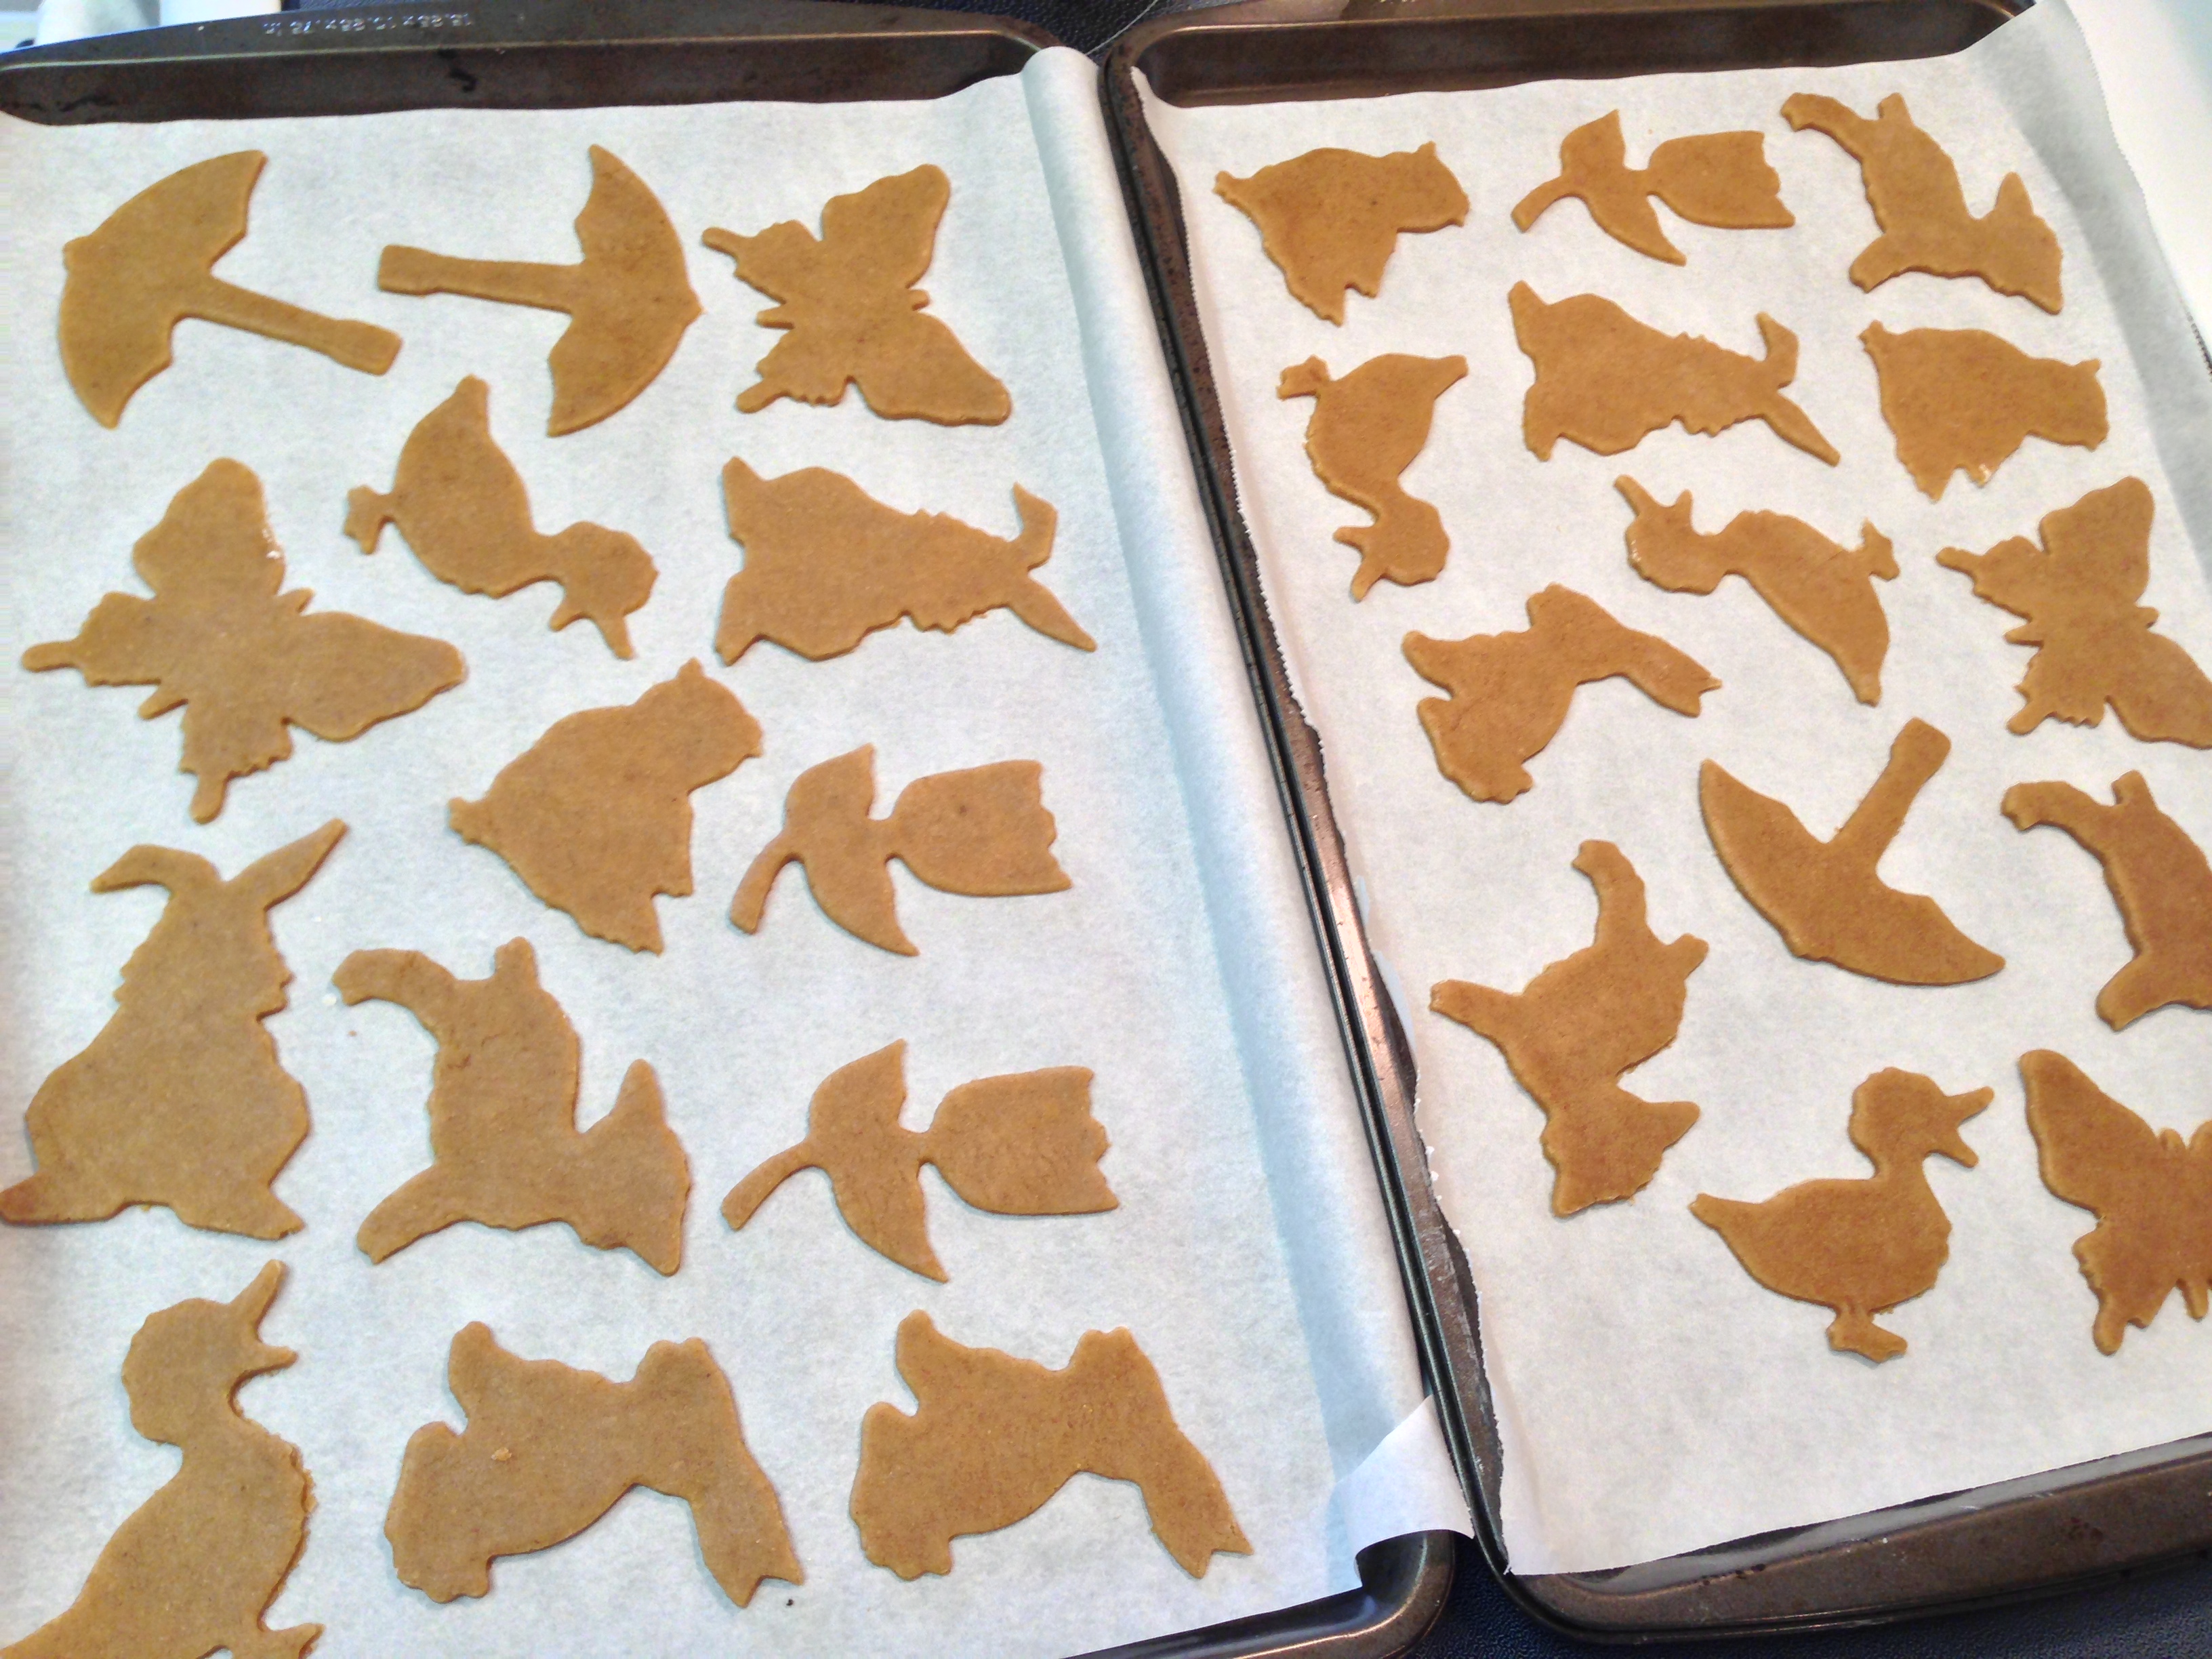
Now for the fun! Cut your cookies into fun shapes! I stuck to my springtime theme of ducks, bunnies, flowers, umbrellas, lambs, and chicks.  Transfer the cut cookies to your lined baking sheets. I used a butter knife to help me pick them up (or you could use a floured spatula).

IMG_5392 IMG_5406 IMG_5394 IMG_5396


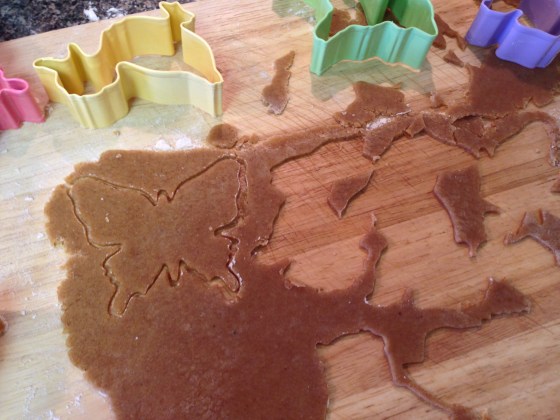
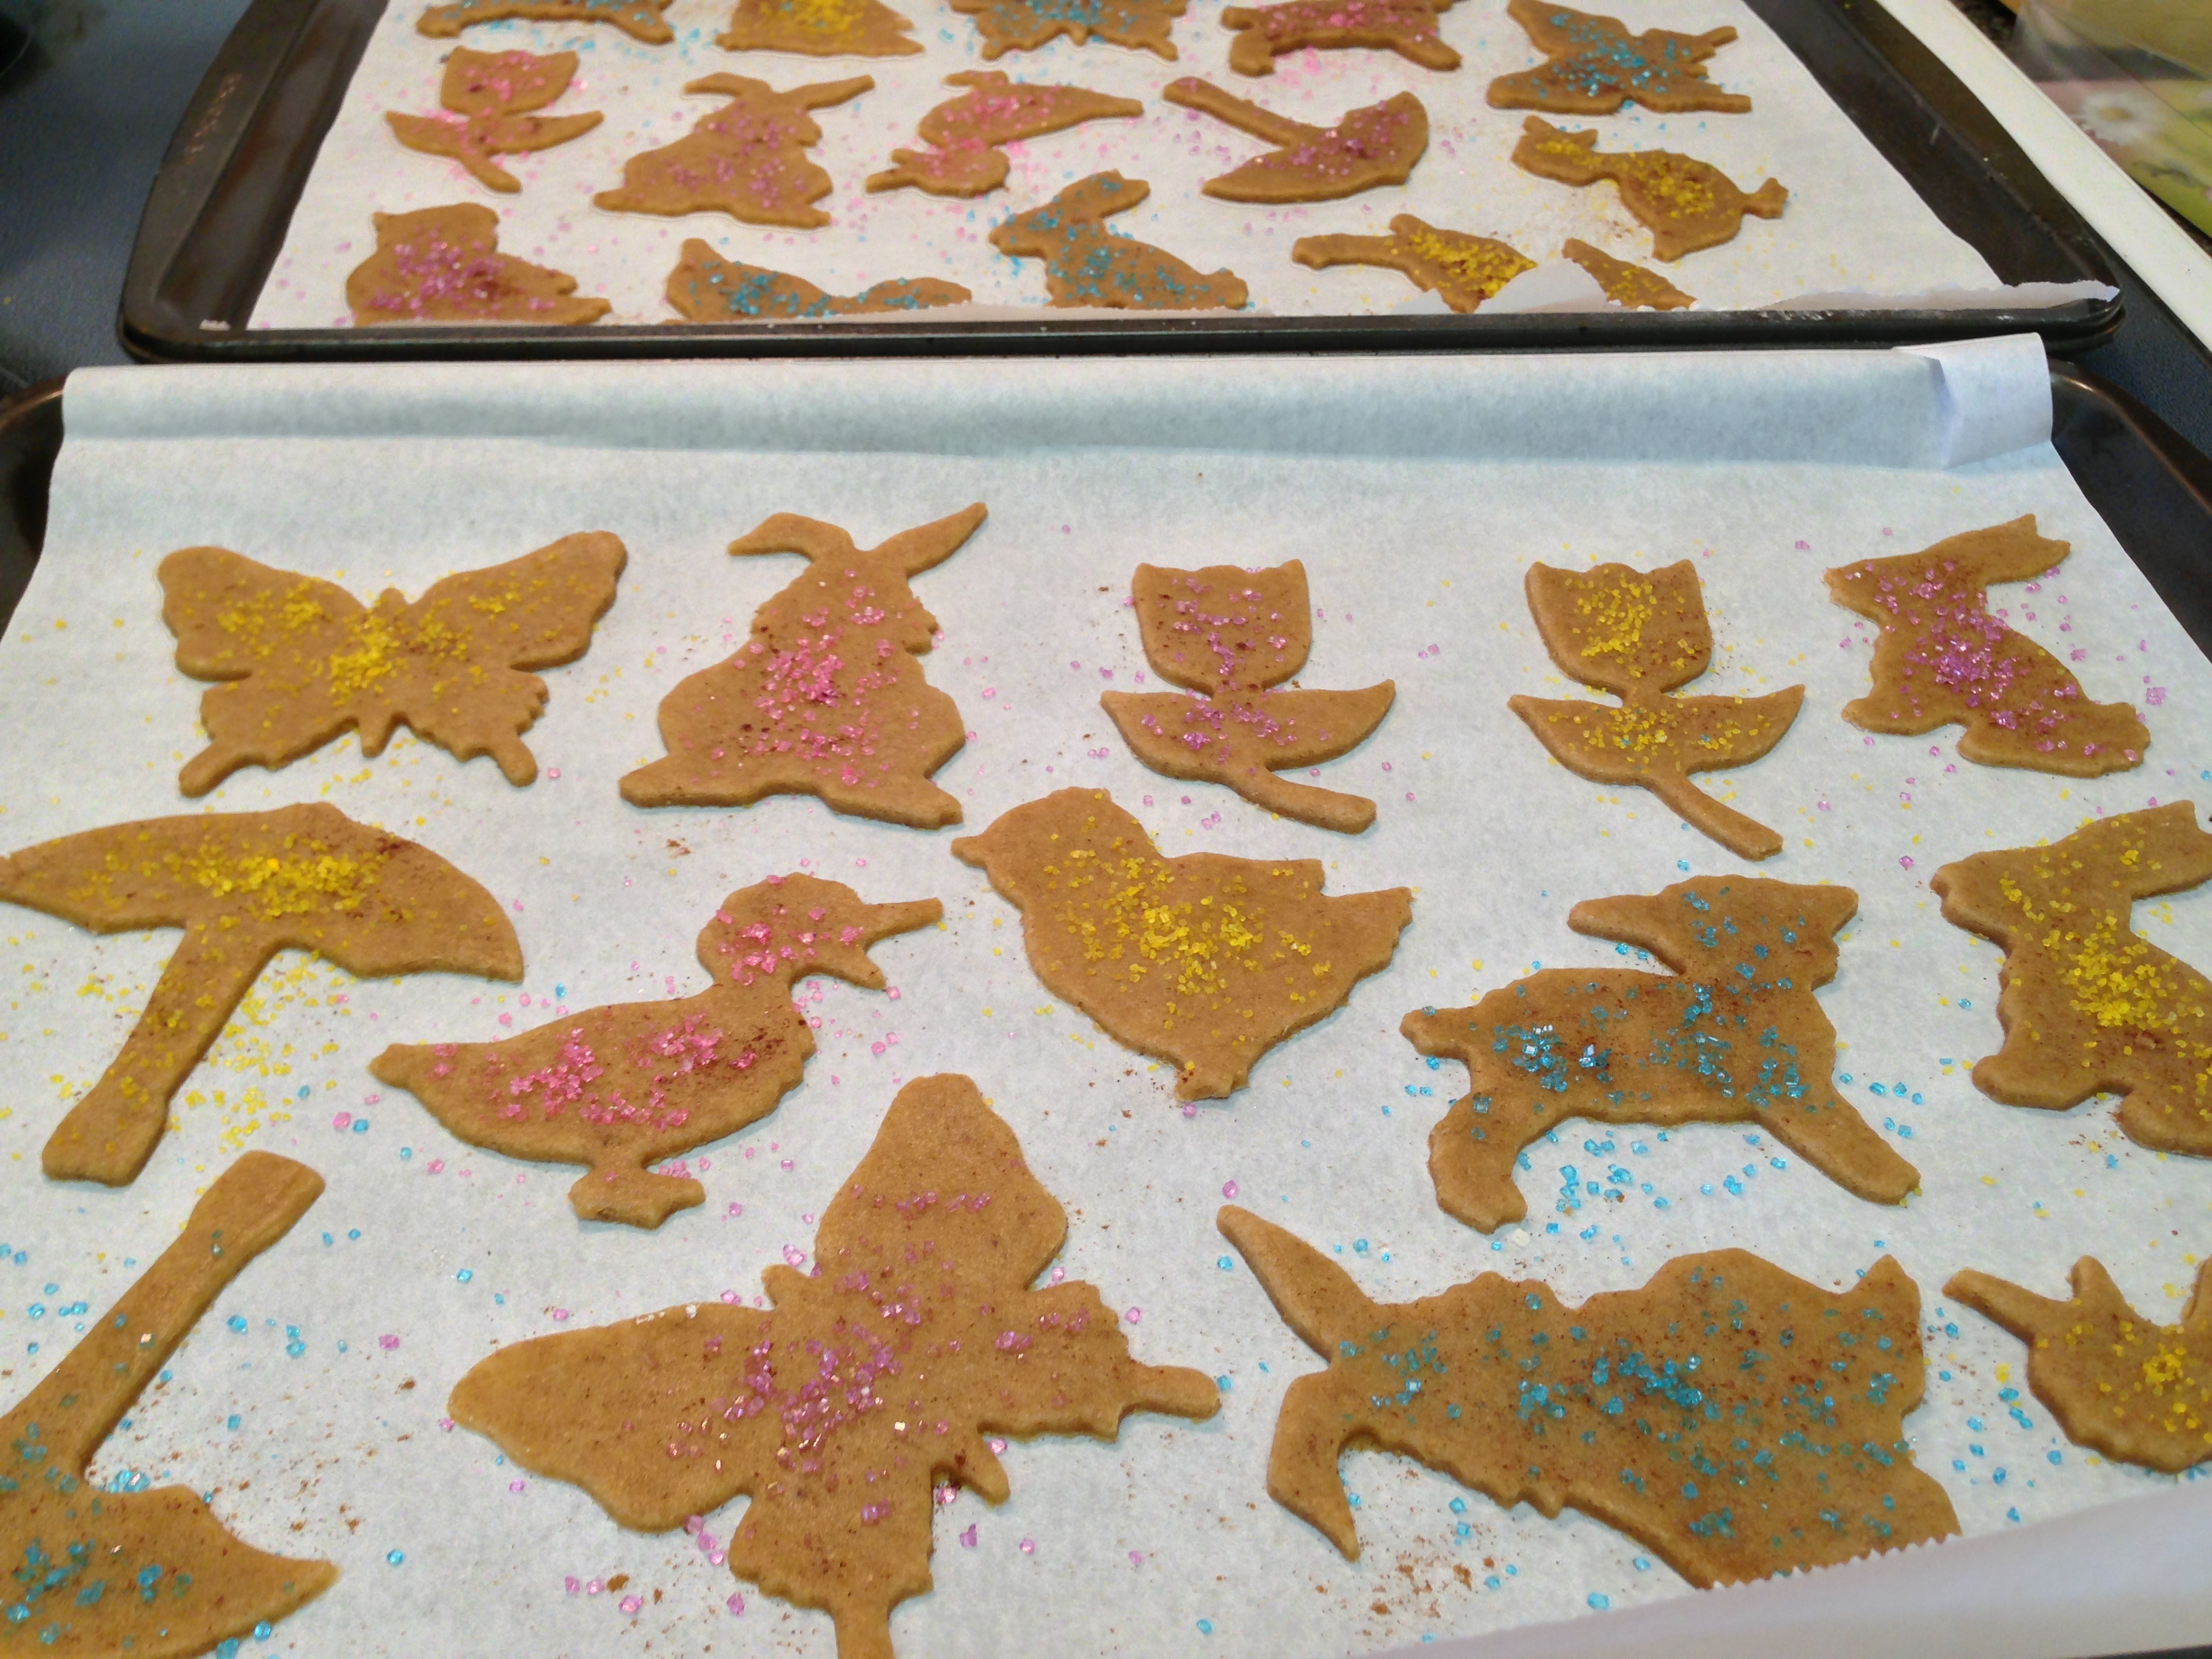
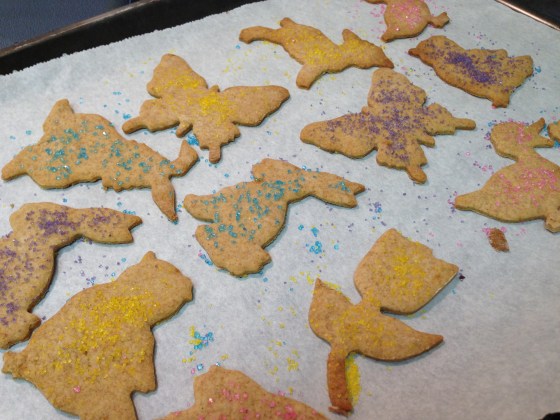
Once your cookies are all transferred, sprinkle them coloured sugars to make them extra pretty!

IMG_5401IMG_5404


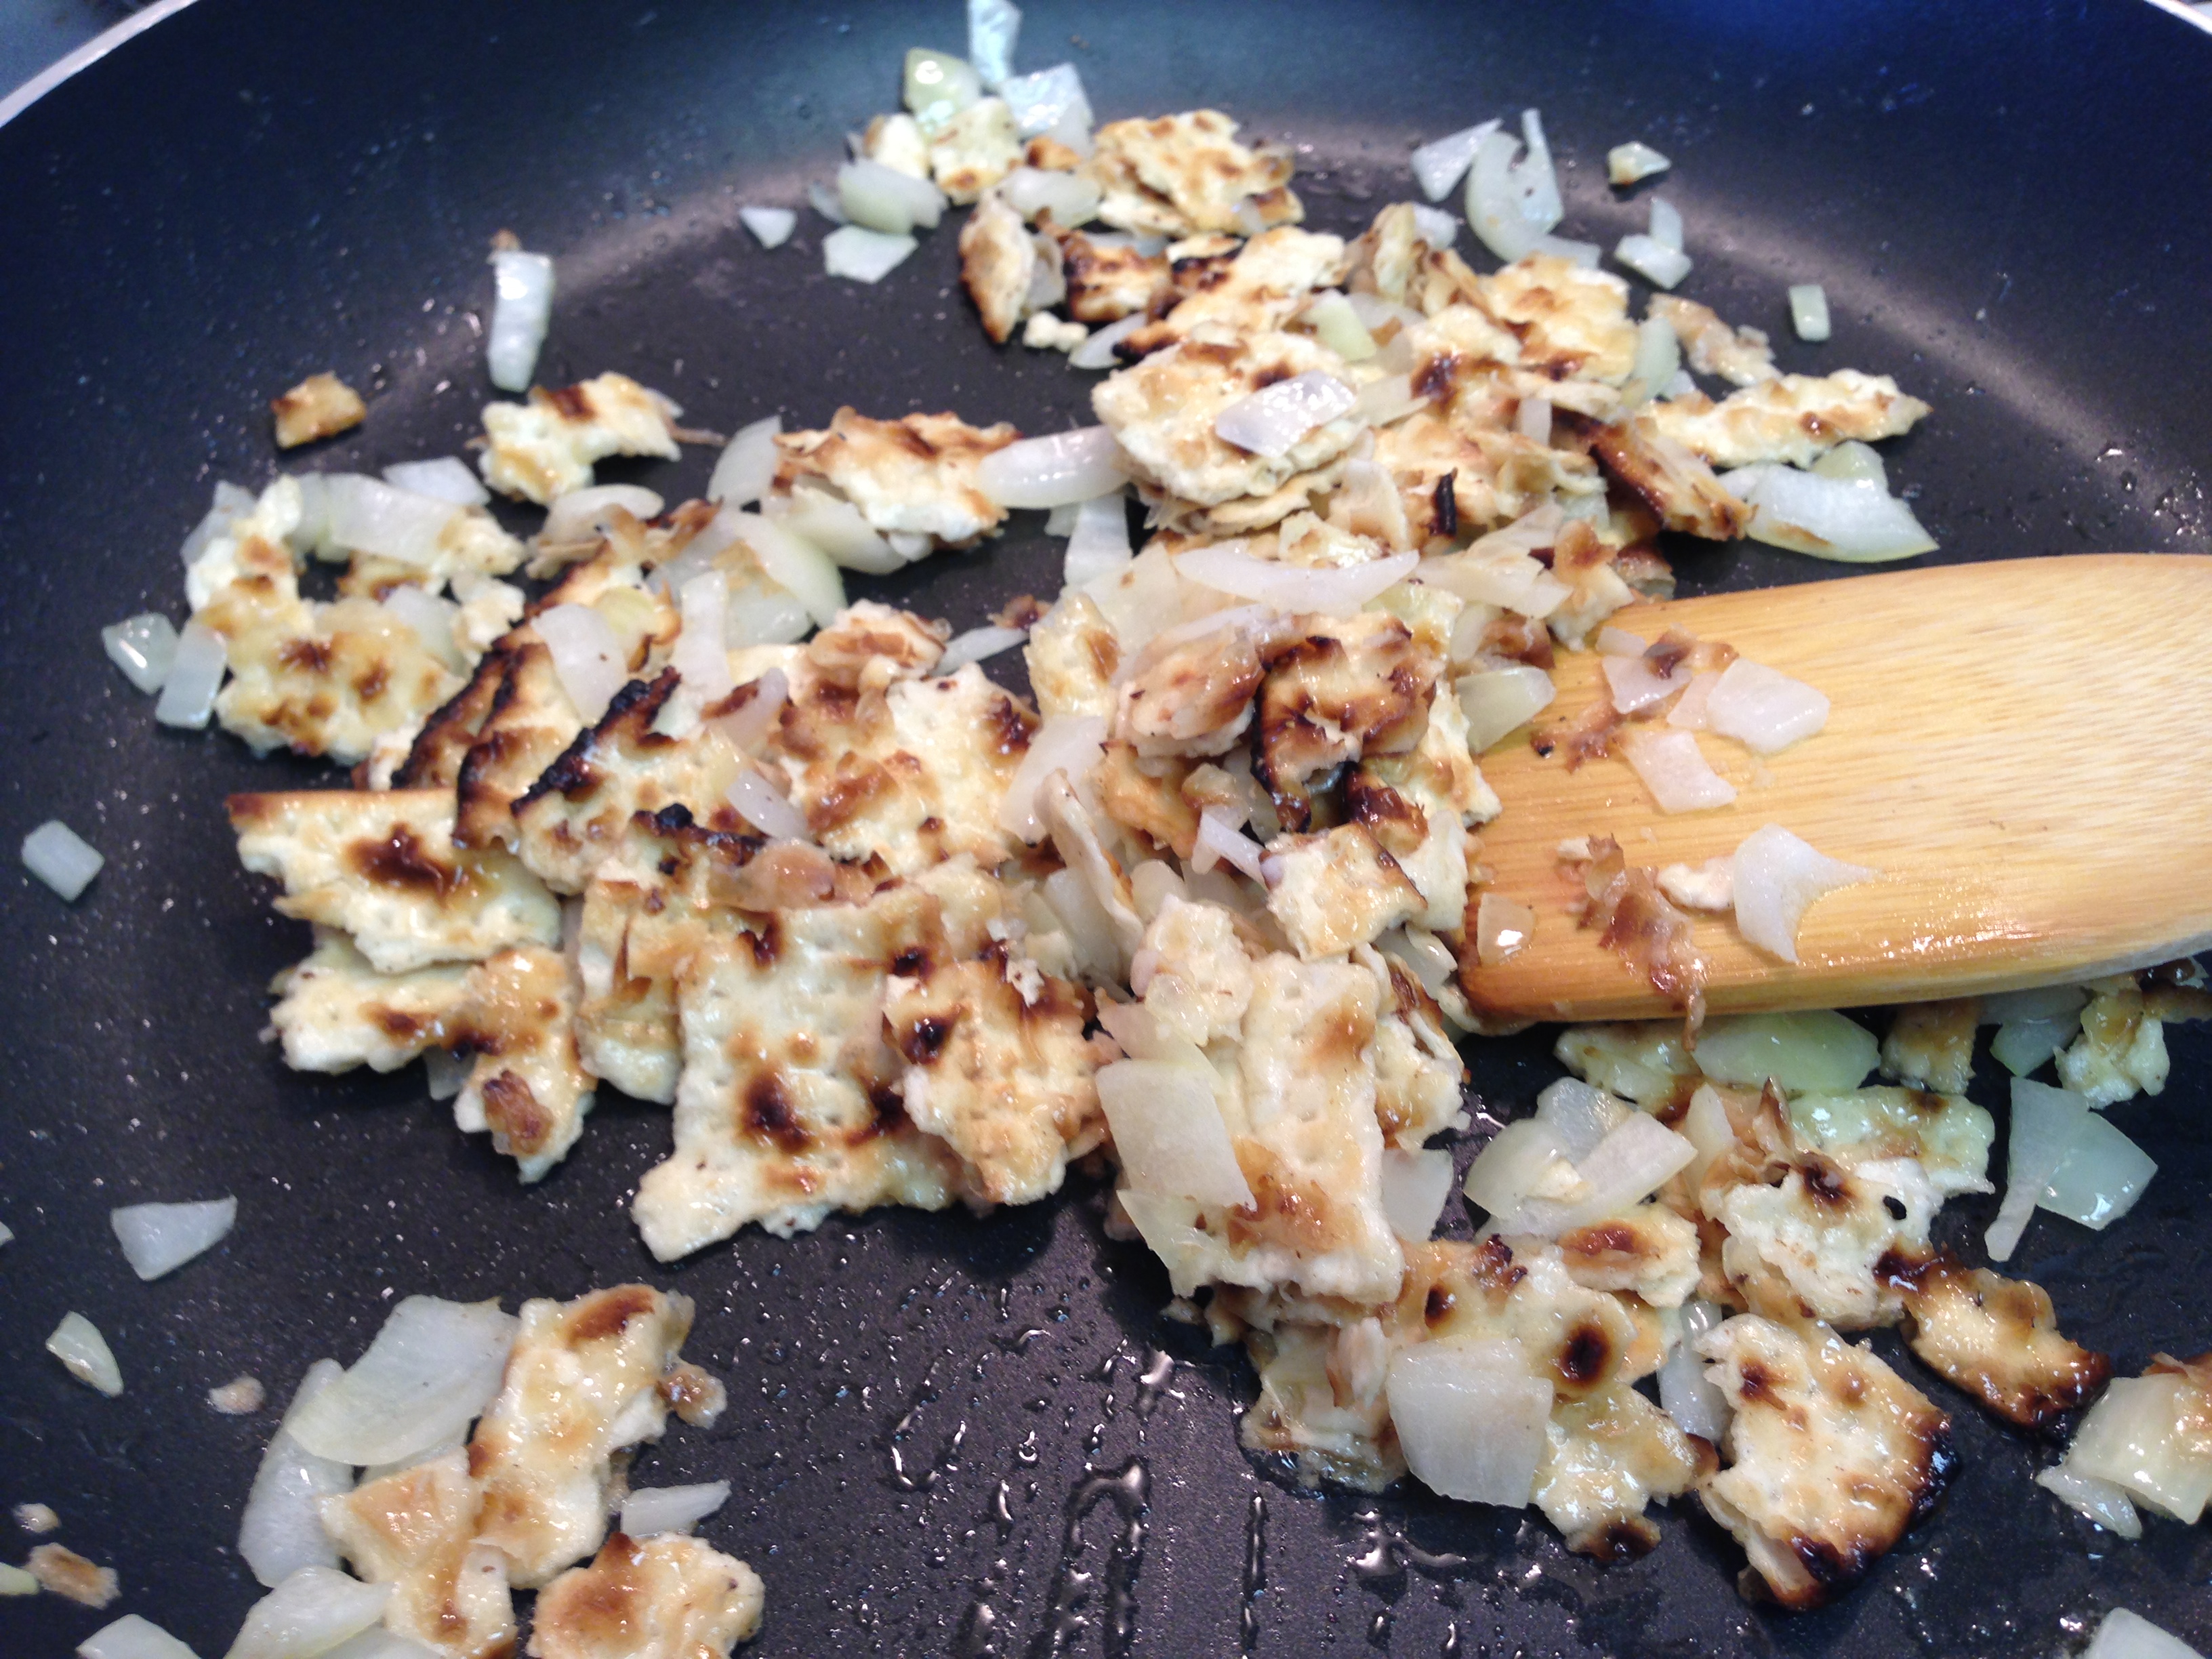
Bake your cookies for 6 to 8 minutes or until the edges just start to brown. Let them cool for a couple minutes before you move them from the baking sheets. I ended up baking mine a little too long, and some of them were burnt. 😦

IMG_5407 IMG_5421

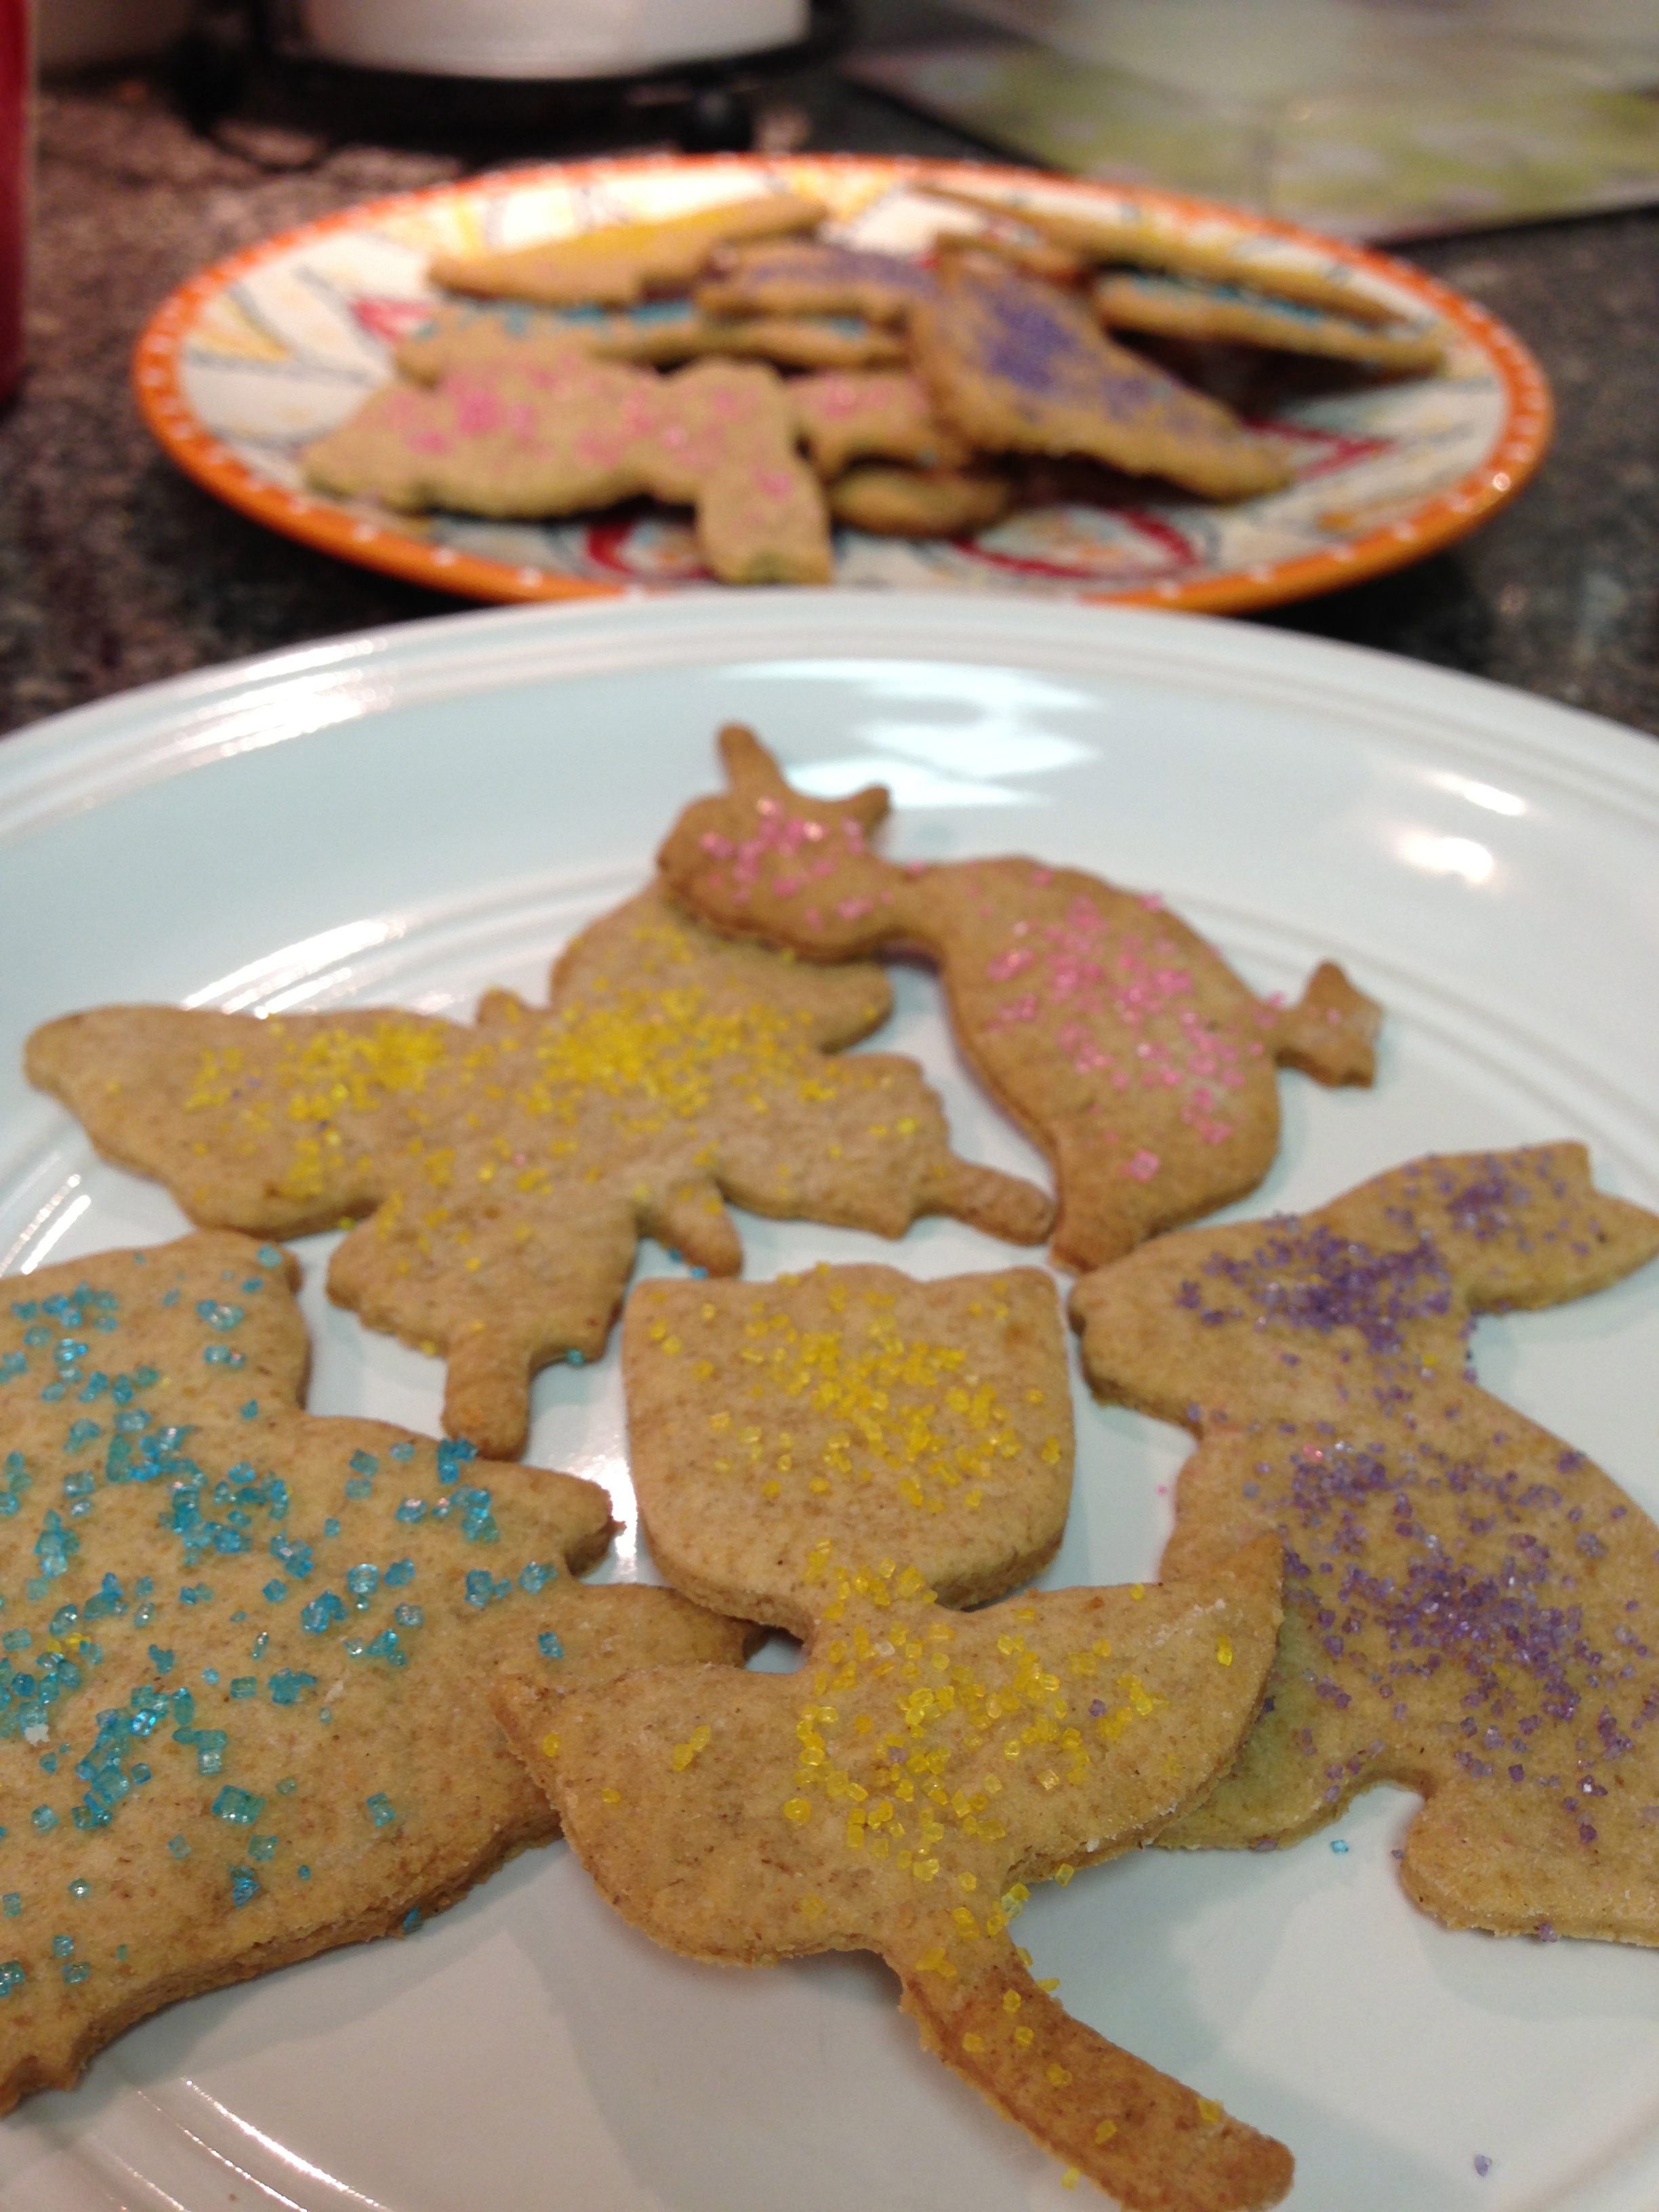
Now, try a few! (I said FEW, NOT ALL.)

These cookies should stay good in an airtight container for about a week. Ha! They won’t last a week anyway. So tasty!

Happy springtime baking, friends!

xx


MATZAH BREI! Breakfast: Passover Style.

It’s Passover! Whether you’re Jewish or not, this recipe is delish. Give it a try! Here’s your opportunity to get all festive and creative! 🙂

IMG_5601This is a yummy breakfast dish I came across today. As Passover begins, and all you can eat is matzah day and night, it’s fun to find new ways to cook with it. Matzah brei is a dish commonly eaten as a breakfast food during passover, sort of a Jewish version of a universal breakfast (eggs and something bready). It is typically made with matzah soaked in water, broken, and pan fried with scrambled eggs in butter or schmaltz (rendered chicken or goose fat). However, you can totally play it up by serving with applesauce or sour cream, adding veggies, or making it a sweet treat by adding sugar, vanilla, or syrup. Matzah brei can be scrambled or done as more of a frittata.

I chose savoury over sweet this morning. I added onions into the mix, sprinkled a bit of cheddar cheese on top, and served it with a baked sweet potato on the side. Play around with your own ingredients. Here’s my recipe:

Matzah Brei

Ingredients:

  • 1 sheet of matzah
  • 3 eggs
  • 1 tablespoon of butter
  • Half a small onion diced (optional)
  • Salt and pepper to season
  • 1-2 tablespoons of grated old cheddar cheese (optional)

IMG_5573

IMG_5606

IMG_5580

Whisk your eggs together in a bowl.

IMG_5575 IMG_5577

Run the sheet of matzah under water for about 45 seconds. Maybe a little more or less, depending on the type of matzah you use. Just until it starts to soften, don’t let it turn to mush.

IMG_5583

Set the wet matzah aside and melt the butter in a pan.

IMG_5579

Next, you break the sheet of matzah into bite-sized pieces. Add them into the pan along with the diced onions. (If you want to add any other veggies, add them into the pan with the matzah pieces now.)

IMG_5586

Fry until the matzah is well coated in butter and your onions are translucent. About a minute or so.

IMG_5587

Now add your scrambled eggs into the pan and mix them in with the matzah and onions. Cook the eggs for about two minutes. Just keep flipping them around. You dont want them to overcook or they’ll be dry. Leave them a bit mushy. You can add salt and pepper to taste while you’re cooking the eggs.

IMG_5592

IMG_5594

All done! Now just plate it and sprinkle a little grated cheese on top if you like.

IMG_5605

Chag Sameach! Happy Passover! And happy breakfasting! 🙂

xx

Lobster & Shrimp Linguine in a White Wine Sauce

As promised, here’s the second half of the heavenly dinner I created last night. Of all the different pasta I’ve made, this is definitely one of my favourites. The recipe is really simple and outrageously delicious.

IMG_4990

I like to keep my pasta recipes simple. The fresher the ingredients, the less seasoning you need. Only add what you must. You want all the flavours to stand out, but also compliment one another. Keep it simple.

As we all know, I LOVE seafood. I was in the mood for shrimp linguine, but on my way to pick up the shrimp I noticed lobster tails were on sale. Why not make this pasta twice as good? I did.

Lobster & Shrimp Linguine in a White Wine Sauce
(Serves 2)

Ingredients:

  • 10 white tiger shrimps, peeled and deveined (I used 5 shrimps per person, you can use more or less. You can also use any type of shrimp you like)
  • 2 lobster tails, de-shelled and cut into 1-inch cubes (My tails were not too big. Again, use more or less if you like.)
  • 3 or 4 cloves of minced garlic (I like lots of garlic.)
  • truffle salt/sea salt
  • black pepper
  • 1/4 cup of butter
  • 1-2 tablespoons of butter or olive oil
  • 1/2 cup white wine (I used a chardonnay…it’s what I had at home.)
  • 2-3 tablespoons fresh chopped parsley (Use dry if you don’t have fresh.)
  • Linguine (enough for 2 servings)

I chose to cut my lobster tails in half, remove the meat, and then cut the meat into smaller cubes.

IMG_4985

IMG_5002

In a large saucepan of boiling salted water cook the linguine until al dente. You don’t want your pasta mushy, it should be firm but not hard. You should add about 1/2 a teaspoon of salt for every 8 cups of water. Don’t get salt-crazy.

Melt some butter in a pan at medium low heat. This is to cook the shrimp and lobster in. I mentioned, in the ingredients, that you could also use olive oil for this step if you prefer using less butter, just make sure the pan is well coated. Add in your garlic and some pepper (to taste). Let the garlic saute for 1-2 minutes. Don’t burn it, just let it sizzle a bit.

IMG_5001

Next add the shrimp and lobster. Spread the pieces out in the pan.

IMG_4999

You want to cook the shrimp until they’re just pink. Cooking them for about 2 minutes per side should be enough, depending on the size. Shrimp cooks fast! Don’t overcook! The lobster will cook quickly as well. It will be firm, white, and opaque when it’s done.

IMG_4998

Once cooked, move them quickly from the heat of the pan to a bowl or plate. In the same pan, add the butter and wine. Add some salt (I used truffle salt :)) and more pepper to taste. Let this simmer until the sauce starts to thicken a little.

IMG_4997

Next, add your shrimp and lobster back into the sauce along with 2 tablespoons of parsley and stir a bit. Everything’s cooked, you just want to warm it up and get everything to the same temperature. Add your cooked pasta into the pan and toss it all together.

IMG_4995

Now plate your pasta, you can add a bit of extra parsley on top, and dig in!!! This recipe is so simple and it tastes so good! Let me know how it turns out.

Happy eating! xx

A Proper Caesar Salad.

Last night’s dinner was AMAZING. I’m so excited about how well it turned out I don’t even know where to begin. So I’ll begin with a photo…

IMG_4991

We decided it would be a Caesar salad kind of night. When I got to the grocery store, I decided it was also going to be a shrimp and lobster kind of night too! Lobster tails were on sale…I can’t say no to lobster.

IMG_4939

Have you ever wondered about the origin of Caesar salad? (I do wonder about these things.) No, Julius Caesar did not invent this salad in ancient times. The salad is named after Caesar Cardini, an Italian immigrant and chef in the United States and Mexico. The earliest documentation of these salads was in the 1940’s. Chef Cardini never used anchovies in his original dressing, the anchovy flavour came from the Worcestershire sauce. I love a good Caesar salad with anchovies. If you’re going to make a Super Caesar, it has got to have the little fishies.

I’ve always wanted to make Caesar salad dressing from scratch, but never really got around to it. I wanted to find the best recipe to use. Tonight, I found it! I’ve heard such good things about the Caesar salads at Jacobs & Co. Steakhouse (Toronto, Ontario, Canada.). They do tableside Caesars right at your table, dressing and all! If you’ve ever been there, you must know what I’m talking about. I was determined to find Jacobs’ recipe. During my search, I came across this fantastic video on YouTube. (Watch it.)

There were no exact measurements in the video for the ingredients so I used my own judgement, and the salad turned out exactly how I wanted it! It’s a garlic-y vinaigrette Caesar dressing. My favourite kind. You must try this for yourself, it’s terrific! Here’s my take on the Jacobs & Co. recipe:

How To Make A Caesar Vinaigrette & A Great Caesar Salad (Jacobs & Co. Steakhouse Recipe)
(Serves 4)

Ingredients:
(You can totally adjust the amounts of these ingredients to your own liking/taste. Adding more olive oil will make it a bit creamier.)

  • 1/2 tablespoon black pepper
  • 1/2 tablespoon sea salt
  • 2 anchovy fillets
  • minced garlic (1 or 2 cloves, depending on how much you like garlic. I used 2 cloves.)
  • 2 egg yolks
  • 1 or 2 splashes Tabasco hot sauce (out of the bottle)
  • 1 teaspoon Worcestershire sauce
  • 2 1/2 tablespoons red wine vinegar
  • 1 tablespoon lemon juice (I used fresh lemon juice)
  • 1/3 cup extra virgin olive oil
  • 2 tablespoons grated Parmesan cheese (some extra to sprinkle on top if you like)
  • bacon bits (I made my own using 2 slices of smoked side bacon)
  • 1 cup croutons
  • 1 head of romaine lettuce (Judge by your amount of dressing how much lettuce you want to use.)

If you’re going to make your own bacon bits, start by frying the bacon in a pan until it’s nice and crispy. Then chop it up. (It may even just sort of crumble if it’s crispy enough.)

IMG_4941

IMG_4951

Wash, dry and cut your lettuce. Have it ready to mix into the dressing later on.

Use a large salad bowl. Start by grinding your pepper into this bowl. Next, add your sea salt, anchovies and garlic.

IMG_4955

IMG_4961

Using a fork or spoon smash it all together. Your goal to mash the anchovies into a paste.

IMG_4965

Add in the 2 egg yolks, Tabasco sauce, Worcestershire sauce, red wine vinegar and lemon juice. Mix, mix, mix.

IMG_4975

IMG_4977

Add the olive oil SLOWLY, bit by bit, while mixing. You want to emulsify all the flavours. The faster and longer you mix, the creamier the dressing will get. (If you’d like your dressing to be creamier, add more olive oil.) Mix in the 2 tablespoons of parmesan cheese, bacon bits, and croutons into the dressing.

IMG_4983

You did it! Now mix in the romaine lettuce and you’re done! Add more or less lettuce depending on how much dressing you have. Don’t overdress the leaves, but make sure they’re well coated. This is going to be the best Caesar salad you’ve ever had. You can add a little more parmesan on top of your salads once you’ve plated them.

IMG_4994

The lobster & shrimp linguine recipe shall follow! xx

Simple Oven-Roasted Asparagus

Oven-roasted veggies are always a super easy addition to any meal. I roasted some asparagus tonight. Asparagus is full of nutrients, anti-oxidants and fiber. A quick and healthy recipe!

IMG_4841

Preheat the oven to 350 degrees F. Now wash and trim your asparagus. I always snap the end off with my hands. This gets rid of the tough parts.

IMG_4838


Lay the asparagus on a baking tray lined with parchment paper (or foil). Drizzle olive oil over top, add some minced/pressed garlic (however much you like, I love tons of garlic) and season with salt and pepper.

IMG_4843


Bake the asparagus for about 10-15 minutes (until just tender). Baking time varies depending on how think your asparagus is.

IMG_4845


Ready to eat! Wasn’t that easy? You can do this with tons of different veggies! Sometimes I sprinkle a little lemon juice over top after baking.

Happy and healthy eating! xx


Key Lime Pie In The Sky!

I made a spur of the moment decision that tonight was a good night to bake my first pie. And for some reason, right after I thought pie…I thought key lime. I didn’t even realize until just now how fitting it is to make a lime pie over the St. Patty’s Day weekend (limes…green…get it?). So I looked up the simplest recipes I could find, picked one that seemed foolproof, and picked up a few things from the store on the way home. I stuck to a simple recipe just to be safe. I always start simple when I’m trying something for the first time. Everything was going smoothly until I discovered that the recipe I was trying to follow, that was supposed to be for one pie, actually made enough filling for two. So I had to save half the filling and make a second crust. (Who wants a free key lime pie?!) Despite the fact that I try to be Chef Vanessa: Master Chef of the Universe in the kitchen, things don’t always go as planned. Most of the time they do not. But that’s what keeps things exciting, right?

A fresh chilled key lime pie is so refreshing. I love it’s tart, sweet, creaminess. Here’s how I made mine. Hope you find this recipe useful. It was really easy. You can do it! 

Key Lime Pie (makes one pie)

Ingredients:

  • 1 1/2 cups graham cracker crumbs (I smashed them in a ziploc bag with a rolling pin)
  • 1/2 cup sugar
  • 4 tablespoons softened butter (1/2 a stick of the small butter sticks)
  • 1 (14 ounce) can of sweetened condensed milk (that’s about 420 mL…I couldn’t find a 14 oz can at the store)
  • 1/2 cup of key lime or regular lime juice
  • 1 whole large egg
  • 1/2 tablespoon lime zest
  • 1/2 cup sour cream (about half of those small half-size sour cream tubs…about 125 mL)
  • 1 tablespoon powdered sugar (icing sugar)

Let’s Bake!

Preheat the oven to 375 degrees F.

Image

This part’s fun! In a bowl, mix the graham cracker crumbs, sugar and butter with you hands! Just keep squishing til the butter’s all mixed in. You’ll have a crumbly playdough kind of texture.

IMG_4781

IMG_4784

IMG_4785

Take this crust mixture and press it firmly into a 10-inch pie pan. Really pack it down. And then bake until the crust is brown, about 20 minutes.

IMG_4804

IMG_4805

Crust done! Remove it from the oven and let it cool to room temperature. Lower the oven temperature to 325 degrees F.

Now in a separate bowl, you will make the filling. Combine condensed milk, lime juice, egg, and lime zest. Whisk until well blended.

IMG_4794 IMG_4802

Place the filling into the cooled pie shell and bake in the oven for 15 minutes (at 325 degrees).

IMG_4809

IMG_4810

IMG_4814

The pie won’t look any different then it did when you put it into the oven. The filling is baked and solidified now. Chill it in the refrigerator for at least 2 hours. I chilled mine overnight because it was so late.

Once your pie is chilled, mix the sour cream and icing sugar and spread the mixture over the top of the pie with a spatula. I added a little lime zest on top to make it pretty. Serve chilled!

IMG_4817

IMG_4818

IMG_4819

Mission complete! So proud of my first pie! Happy St. Patrick’s Day! And happy baking! xx

(Maybe I’ll add to this post when I’ve eaten the pie later tonight.) 🙂

May your glass be ever full.
May the roof over your head be always strong.
And may you be in heaven half an hour before the devil knows you’re dead.
—Irish prayer

Â